


Table of Contents
- Why Your Weekend Projects Stall in a Disorganized Garage
- Zone Your Garage by Project Type for Faster Workflows
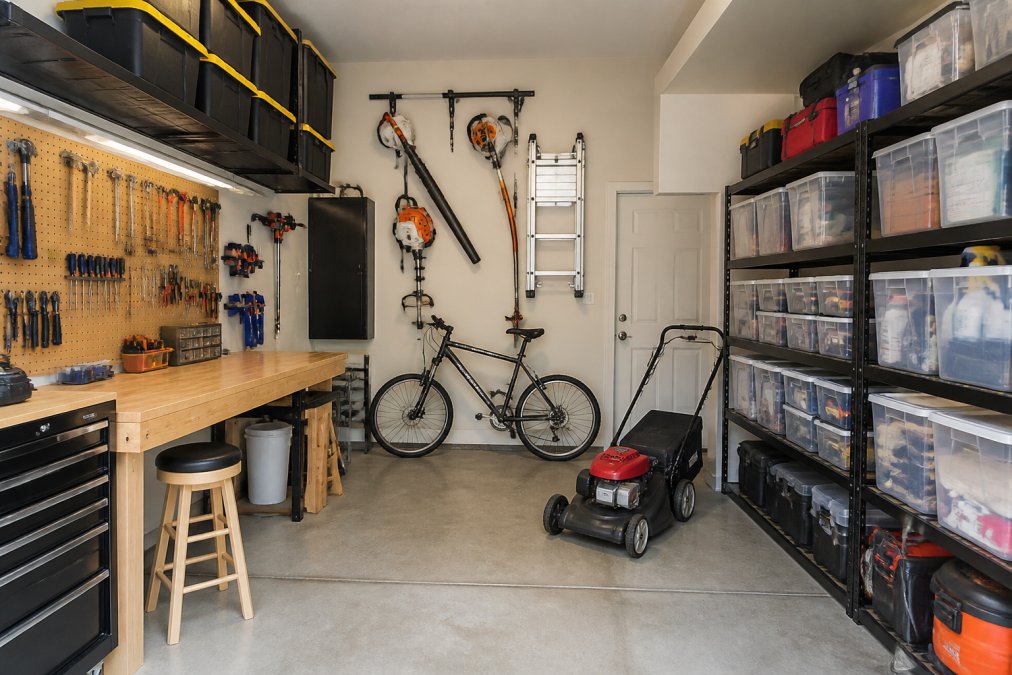
- How to Organize Small Garage Space with Vertical Storage
- Heavy-Duty Garage Storage Systems That Handle Real Weight
- Garage Workbench Organization Tips for a Clutter-Free Workspace
- Storage Bins, Labeling, and Inventory Management
- Common Garage Organization Mistakes to Avoid
- Conclusion: Build Your Garage Setup This Weekend
- Frequently Asked Questions
Last Updated: September 5, 2026
Why Your Weekend Projects Stall in a Disorganized Garage
You clear a Saturday morning for that shelving build or bike tune-up, only to spend the first 45 minutes hunting for a socket set you know you own. The best garage organization for weekend projects starts with a plan, not another storage bin purchase. At Superior Tool Garage and Outdoors, the difference between a space that enables projects and one that kills momentum almost always comes down to layout and access.
Garage organization arranges tools and materials so every item has a designated home that supports your workflow. A disorganized garage creates friction that makes you less likely to start a project at all. Below, we show you how to structure your space so setup takes minutes, not an entire morning.
Zone Your Garage by Project Type for Faster Workflows
The most effective garage layouts divide floor space into dedicated zones based on the type of work you do, rather than storing items by category alone. Grouping items by the task they serve means you can move from one project to the next without crossing the garage to grab a single wrench.
Start by listing the three or four projects you tackle most often. Assign each one a specific area, and store the tools for that project within arm's reach of its zone. For example, a homeowner who changes their own oil might keep a dedicated auto repair tool kit and a 3/8" Drive 16 Piece Metric Socket Set in a rolling cart near the driveway access, so the setup moves to the car in one trip.

How to Organize Small Garage Space with Vertical Storage
When floor space is tight, the only direction left to build is up. Vertical storage systems convert dead wall space into accessible tool and material storage, clearing the floor for the car, a workbench, or a project staging area.
Wall-Mounted Systems and Slatwall vs. Pegboard
Wall-mounted systems come in two dominant forms: slatwall and pegboard. Slatwall uses horizontal grooves that accept many brackets, hooks, and shelves, making it highly modular. Pegboard offers a classic grid of holes for peg hooks, excellent for hand tools you reach for constantly, but less forgiving for heavier items or large accessories.
For most weekend project garages, a combination works best. Install a pegboard above the workbench for frequently used hand tools, and use slatwall along other walls for bulkier items such as extension cords, garden tools, and power equipment. The 50 Piece General Household Toolbox is a solid foundation for a pegboard setup because its compact layout makes it easy to transfer frequently used tools to the wall.

Overhead Ceiling Racks for Bulkier Items
Overhead ceiling racks are the answer for items you use seasonally or rarely, such as kayaks, lumber offcuts, or holiday decorations. These racks mount to the ceiling joists and lift bulky items out of the way. Before installing, verify that your ceiling joists are rated for the load, and always use the manufacturer's specified hardware.
A common mistake is storing items overhead that you need regularly, turning a 10-minute retrieval into a 30-minute chore. Reserve overhead space for the truly occasional items, and keep a step stool near the garage door for safe access.
Heavy-Duty Garage Storage Systems That Handle Real Weight
Lightweight shelving units that wobble under a load of paint cans are a false economy. A proper unit distributes weight evenly and stays stable even when you pull a heavy bin off the top shelf. Look for welded steel frames and solid, reinforced shelves rather than particleboard, which sags over time.
Calculating Weight Capacity and Structural Safety
Before you load a shelf, you need to know what it can actually hold. A 72" Adjustable Metal Shelving unit is rated for a substantial per-shelf load, but that rating assumes the weight is distributed evenly and the unit is properly assembled. Overloading a single point can cause it to buckle, even if the total weight is within the rated capacity.

Keep the heaviest items on the lower shelves and never exceed the manufacturer's per-shelf weight rating. When in doubt, anchor tall shelving units to the wall studs to prevent tipping, especially where children or pets might be present.
The Missing Spec: Structural Attachment and Deflection
Most guides stop at "check the weight rating," but the real safety margin comes from how the unit transfers load to the building structure. For any shelving unit over 6 feet tall, lag bolts into wall studs are non-negotiable. Use 5/16-inch lag screws at least 3 inches long, driven into the center of the stud, not into drywall alone.
For overhead ceiling racks, the math is different. Ceiling joists in most residential garages are spaced 16 or 24 inches on center. A rack that spans two joists can safely carry more than one that mounts to a single joist, but you must verify the joist size and span. If unsure, consult the IRC span tables for your region or hire a structural engineer.
Deflection: The Silent Failure Mode
Weight ratings tell you when a shelf will catastrophically fail, but not when it will sag enough to make bins impossible to slide out. A steel shelf rated for 500 pounds per level may deflect noticeably at 300 pounds if the shelf is 48 inches long. A simple test: place your heaviest item on the shelf and measure the gap between the shelf and the support beam with a straightedge. If the gap exceeds 1/8 inch, redistribute the load or upgrade to a shelf with a center support.
Load Distribution Strategies for Real Projects
Weekend projects create concentrated loads that generic storage advice ignores. A stack of 20 sheets of 3/4-inch plywood weighs roughly 1,500 pounds, concentrated in a 4x8 footprint. Do not place that stack on a single shelving unit. Instead, build a dedicated plywood cart with 2x4 framing and locking casters, or store sheets vertically in a purpose-built A-frame rack. Similarly, a rolling tool chest loaded with mechanics tools can exceed 800 pounds; verify that the casters are rated for the total weight.
Anchoring Protocols for Seismic and Wind Zones
In seismic zones (California, Oregon, Washington) and high-wind regions (Florida, Texas, the Gulf Coast), anchoring is not optional (fema.gov). The International Residential Code (IRC) requires that shelving and storage racks in garages be braced to resist lateral forces (iccsafe.org). Anchor the top of tall shelving units to wall studs with angle brackets, at least two per unit, one near each top corner. For freestanding workbenches with heavy tools on top, secure the bench to the floor with concrete anchors if the slab is thick enough.
A common pattern among professional garage outfitters is to install a continuous 2x4 ledger board along the wall at the height of the shelving unit's top rail. This ledger distributes the load across multiple studs and prevents the unit from tipping forward when you pull a heavy bin off the top shelf, the most common cause of garage storage accidents.
The Bottom Line on Heavy-Duty Storage
The best heavy-duty system is one that matches your actual load profile, not the maximum rating on the box. Measure your heaviest items, calculate the total weight per shelf, and add a 25% safety margin. Then verify that your wall and ceiling structure can handle that load. If the system will hold more than 500 pounds total, consult the IRC span tables or a local structural engineer.
Garage Workbench Organization Tips for a Clutter-Free Workspace
The workbench is the command center of any project garage. A cluttered bench forces you to clear a space before you can even start measuring or cutting. The solution is to give every tool a home that is not the bench top.
Install a pegboard or magnetic strip directly above the bench for tools you use in nearly every project, such as tape measures, utility knives, and screwdrivers. A magnetic strip is particularly effective for metal tools. Below the bench, use drawer units or cabinets for power tools and accessories.
Storage Bins, Labeling, and Inventory Management
A wall of unlabeled bins is only marginally better than a pile of loose tools. Clear containers are the foundation here because they let you see the contents at a glance, eliminating the need to open every bin to find a single box of screws.
Clear Containers and a Labeling System That Works
Choose clear, stackable bins in a few standard sizes, and commit to a labeling system you will actually maintain. A label maker produces the most professional results, but a permanent marker on masking tape works well enough if you are consistent. Label every bin with a specific category, such as "Deck Screws" or "Plumbing Fittings," rather than a vague "Hardware."
For smaller parts like fasteners, nuts, bolts, and washers, a multi-drawer cabinet with clear drawers is a worthwhile investment. These units keep small items sorted and visible, turning a frustrating search for a single screw into a five-second retrieval.
Common Garage Organization Mistakes to Avoid
Most garage organization failures share the same root causes. The most common mistake is buying storage containers before you have sorted and decluttered your existing tools. You end up with a garage full of bins holding items you no longer use, which simply moves the clutter from the floor to a shelf.
Another frequent error is ignoring the weight capacity of your storage systems. A shelf rated for 50 pounds per level will fail if you stack it with heavy power tools and toolboxes. Always check the manufacturer's specifications and distribute weight evenly.
A third mistake is creating a system that is too rigid to maintain. If you have to unscrew a lid or move three other bins to return a tool to its home, you will start leaving it on the bench. Design for convenience first. To avoid these pitfalls, choose durable, modular pieces like the Auto Repair Tool Kit or the Professional Screwdriver Set that have their own dedicated storage.
The Climate Control Blind Spot
Most garage organization guides ignore the fact that a garage is an unconditioned space. Temperature swings from 20°F in January to 95°F in July are common, and humidity in the Southeast and Gulf Coast can exceed 70% for months. These conditions destroy tools and materials in ways that no storage bin can prevent.
Woodworking lumber warps and twists when humidity fluctuates. Cardboard boxes of fasteners absorb moisture and rust the contents. Power tool batteries degrade faster in heat, and lithium-ion packs can swell or fail if stored above 140°F. A sealed plastic bin slows moisture intrusion but does not stop it. The fix is climate control, not just containment.
A dehumidifier rated for a two-car garage (typically 50-70 pints per day) will keep relative humidity below 50%, the threshold where rust and mold become significant risks (energystar.gov). Run it continuously during humid months and set the drain hose to a floor drain or a condensate pump. In winter, a small space heater with a thermostat set to 45°F will keep batteries and water-based finishes from freezing. The energy cost is modest, typically $20 to $40 per month, compared to replacing a rusted table saw top or a swollen battery pack.
The Workflow Blind Spot: Storing by Category Instead of by Project
A second overlooked mistake is organizing by category, all screwdrivers together, all paints together, rather than by the project they serve. This works for a hardware store, but it fails for a weekend woodworker who needs a specific set of tools for a single build.
Instead, create project-specific kits. A woodworking zone holds a drill, a driver bit set, a tape measure, a square, and a clamp collection in one rolling cart or on one pegboard section. An automotive zone keeps a socket set, a torque wrench, a drain pan, and a funnel together near the garage door. This is the difference between a garage that stores things and a garage that enables projects.
The "Out of Sight, Out of Mind" Trap
A third mistake is hiding items you use regularly in closed cabinets or high overhead racks. If you have to drag out a step stool to retrieve your circular saw every time you need it, you will start leaving it on the bench. The rule of thumb: items used weekly belong at waist-to-shoulder height on open shelving or pegboard; items used monthly can go on lower shelves or in drawers; items used seasonally belong on overhead racks or in the back of cabinets.
This frequency-based placement is the single most effective way to keep a garage organized over the long term. It is also the principle that most generic listicles miss. A frequency-based system survives real use because it matches how you actually move through a project.
The Maintenance Mistake
Finally, most homeowners never schedule a quarterly review of their garage storage. Over a year, tools break, projects change, and new purchases arrive. Set a recurring calendar reminder for the first Saturday of each quarter to spend 30 minutes walking through your garage, checking for overloaded shelves, tools that have migrated to the wrong zone, and items you no longer use. Donate or sell the unused items, redistribute weight, and return stray tools to their designated homes. This 30-minute habit prevents the slow slide back to chaos.
Conclusion: Build Your Garage Setup This Weekend
A garage that supports your weekend projects is not about buying every storage gadget on the market; it is about creating a system of zones, vertical storage, and labeling that matches how you actually work. Start by clearing the space, then build your zones, and only then invest in the heavy-duty shelving and wall systems that will hold up over years of use.
Superior Tool Garage and Outdoors carries the full range of storage solutions and tool kits you need to execute this plan, from the 72" Adjustable Metal Shelving for bulk storage to the 12V Power Cordless Drill for the projects themselves. Our heavy-duty systems are built to handle real weight and real work, so you can get the job done right. Shop our collection today and reclaim your garage for the projects you have been putting off.
Frequently Asked Questions
What is the most efficient way to organize a garage for weekend projects?
Create project zones. Group your tools and materials by the type of work you do most, like woodworking, auto repair, or gardening. Dedicate a specific area for each zone, then use vertical storage like slatwall or pegboard above a workbench. This cuts down setup and cleanup time, so you spend less time searching and more time finishing the job.
What are common garage organization mistakes?
Storing items on the floor is a common mistake because it wastes valuable space and makes cleaning harder. Other frequent errors include using shelves without checking their weight capacity, skipping labels on bins, and grouping unrelated tools together. A garage without a designated zone for each activity quickly becomes a pile of mixed items that feels overwhelming to sort.
How do I maximize vertical space for tool storage in a small garage?
Install wall-mounted systems like pegboard or slatwall above your workbench to keep hand tools visible and within reach. Use magnetic strips for metal tools and bits. Add overhead ceiling racks for bulky, infrequently used items like seasonal decorations. This frees up floor space and keeps your work area clear for the project at hand.
What weight capacity should I look for in heavy-duty garage shelving?
Check the manufacturer's rating before you load shelves. A standard 72-inch adjustable metal shelving unit typically supports 150 to 200 pounds per shelf, but verify the spec for your exact model. Distribute weight evenly across each shelf and secure tall units to the wall studs to prevent tipping. Never exceed the rated capacity, as structural integrity depends on proper installation.