


Table of Contents
- Planning a Custom Workbench for a Tight Garage Footprint
- Space-Saving Workbench Plans That Actually Fit
- Essential Tools for Garage Woodworking
- Best Workbench Height for DIY Projects
- Cutting Lumber and Assembling the Frame
- Installing the Work Surface and Adding Storage
- Securing the Workbench to Wall Studs and Finishing
- Conclusion
- Frequently Asked Questions
Last Updated: September 10, 2026
Planning a Custom Workbench for a Tight Garage Footprint
A custom workbench for a small garage starts with one honest measurement: how much floor you can give up without blocking a car door, a water heater, or your path to the trash cans. Most garages are tighter than Pinterest suggests, and a bench built to a generic 8-foot plan turns a usable workspace into a storage unit you never enter. Homeowners often buy lumber first, then discover the bench doesn't fit. Plan the footprint before you spend a dollar.
Measure Your Space and Set a Cut List
Measure the wall twice, then subtract for reality. A standard two-car garage gives roughly 20 feet of back wall, but door tracks, outlets, and steps into the house eat into that fast.
Follow this sequence:
- Measure the available wall length at floor level and again at bench height, since foundation ledges often narrow the space.
- Note the location of every wall stud, outlet, and water line.
- Decide bench depth: 24 inches fits most garages, 30 inches if you work with long stock.
- Write a cut list before buying lumber, listing every piece by length and quantity.
A cut list is a written inventory of every board you need, sorted by dimension, so you make all crosscuts at once and waste less material.
Space-Saving Workbench Plans That Actually Fit
Space-saving workbench plans fall into three families: benches that fold flat against the wall, benches that mount to the wall and never touch the floor, and modular benches you reconfigure as projects change. In a garage under 400 square feet, any of the three beats a fixed four-legged bench, because it stops competing with the car for the same square footage.
The most useful number for a small garage is the clear floor depth you need to keep. A car door needs roughly 24 to 30 inches of swing. If your bench depth plus standing room eats that clearance, you will stop using the bench. Measure the car-door swing first, then size the bench to whatever is left.
Folding and Collapsible Designs
A folding bench hinges off the wall and drops flat when the car pulls in. The mechanism matters more than the wood. Use a continuous piano hinge rated for the top's weight, or heavy folding shelf brackets rated at least 2x the loaded top weight. A 3/4-inch plywood top, 24 inches deep and 48 inches wide, weighs roughly 40 to 50 pounds before a single tool, so a bracket rated for 100 pounds per pair is the realistic minimum.

Mount the hinge rail directly into wall studs with lag screws, not drywall anchors, anchors fail within weeks because the load is cyclical, and every fold works the fastener. The trade-off is capacity: a hinged top handles hand tools, electronics, and light assembly, but not an engine block or a vise you lean on hard. If you need a vise, go wall-mounted fixed instead.
Wall-Mounted and Modular Options
Wall-mounted benches use two or three heavy L-brackets lagged into studs, with a plywood top spanning them. A common pattern is brackets at 16-inch centers matching your stud layout, with a 2x4 cleat screwed to the wall first so brackets land on solid wood every time. This design carries medium to heavy loads, a bench grinder, a vise, a stack of lumber, because the wall carries the weight, not the legs.
Modular systems let you add or remove sections as projects change. The usual build is identical 24-inch-wide boxes that bolt together, so a 48-inch bench becomes a 72-inch bench by adding one section. If you rent, wall-mounted or modular is the design to pick, because patching a few lag holes beats repairing a floor-mounted frame.
| Design | Floor Space Used | Load Capacity | Best For |
|---|---|---|---|
| Folding wall bench | None when folded | Light to medium | One-car garages, tight car-door clearance |
| Wall-mounted fixed | None | Medium to heavy | Renters, narrow walls, vise work |
| Modular sections | Configurable | Medium | Changing projects, expanding shops |
| Freestanding frame | Full footprint | Heavy | Dedicated workshops with spare floor |
A Fourth Option Most Guides Skip: The Drop-Leaf Bench
A drop-leaf bench is a wall-mounted fixed bench with a hinged extension leaf. The main top stays up for everyday work; the leaf folds down when you need the floor back. You get the load capacity of a fixed bench on the main top and the space savings of a folding bench on the extension. It costs more in hardware, two hinges and a support leg or bracket, but it best fits a garage where you work most days and park every night.
Essential Tools for Garage Woodworking
Essential tools for garage woodworking come down to six items: a circular saw, a power drill, a miter saw if you have one, a measuring tape, a level, and clamps. You don't need a full shop to build a bench, just tools that cut square and hold steady.
- Circular saw with a sharp framing blade for breaking down 2x4 lumber and plywood
- Power drill with driver bits and a set of drill bits sized for your wood screws
- Miter saw for repeatable crosscuts, optional but a real time saver
- Measuring tape and a carpenter's square for layout
- Wood glue and clamps to reinforce every joint
- Safety glasses and hearing protection, non-negotiable
If you're starting from nothing, a 50 Piece General Household Toolbox covers the fasteners, bits, and hand tools a first bench build actually requires. Buy the specialized stuff later, once you know which projects you keep doing.
Best Workbench Height for DIY Projects
The best workbench height for DIY projects is not one number, it is a range set by your body and the task you do most. Most guides stop at "34 to 36 inches," the average standing height for an average adult, and it is wrong for a large share of people and almost every specialized task.
Calculate Your Height From Your Body, Not a Chart
Stand with your arms relaxed at your sides. Measure from the floor to the crease where your wrist meets your palm. That distance is your working height for general assembly and hand-tool work. For most adults this lands between 32 and 38 inches, which is why the generic 34-to-36 figure exists, but your number is the one that matters.
From that base, adjust by task:
- Detail work (carving, electronics, soldering, small-parts assembly): drop the surface 2 to 4 inches below your working height so you can see down onto the work without hunching.
- General assembly and hand tools: keep it at your working height.
- Heavy work (planing, chiseling, hammering, vise work): raise it 1 to 2 inches above your working height so you can put your weight behind the tool instead of pushing down.
- Precision layout and measuring: many practitioners prefer a height 4 to 6 inches above the working height so the work comes up to the eyes rather than the eyes going down to the work.
If you do a mix of tasks, as most home builders do, pick the height for the task you spend the most hours on, then add a 1/2-inch or 3/4-inch sacrificial top you can remove or replace for a different working plane.
The Vise Problem
A vise changes the math. A bench vise works best when the top of the jaws sits roughly at your elbow height standing relaxed (osha.gov). Mount a vise on a bench set at wrist height and you work below your elbow, losing leverage on every cut and bend. The common fix is a raised block or a dedicated lower bench, so the jaws land at elbow height while the main top stays at wrist height.
How to Fix a Bench That Is Already Built
If your bench is already assembled and the height is wrong, you have three options, in order of effort:
- Add a sacrificial top. A sheet of 3/4-inch plywood or MDF raises the surface by 3/4 inch; stack two for 1-1/2 inches. Fastest fix, and reversible.
- Change your stance. An anti-fatigue mat adds 3/4 to 1 inch of standing height and reduces strain on concrete (the CDC). Not a true fix, but it buys comfort on a slightly low bench.
- Cut the legs down. The permanent fix for a bench that is too high. Cut equal amounts off all four legs, re-drill the leg-to-frame joints, and re-square by matching diagonals. Do not cut the top, you will lose the flat reference surface.
OSHA guidance on ergonomic workstations outlines how working height affects strain during repetitive tasks, and the same principles apply to a home bench. The practical takeaway: a bench that forces you to hunch or reach will cost you in back and shoulder fatigue long before it costs you in lumber.
Cutting Lumber and Assembling the Frame
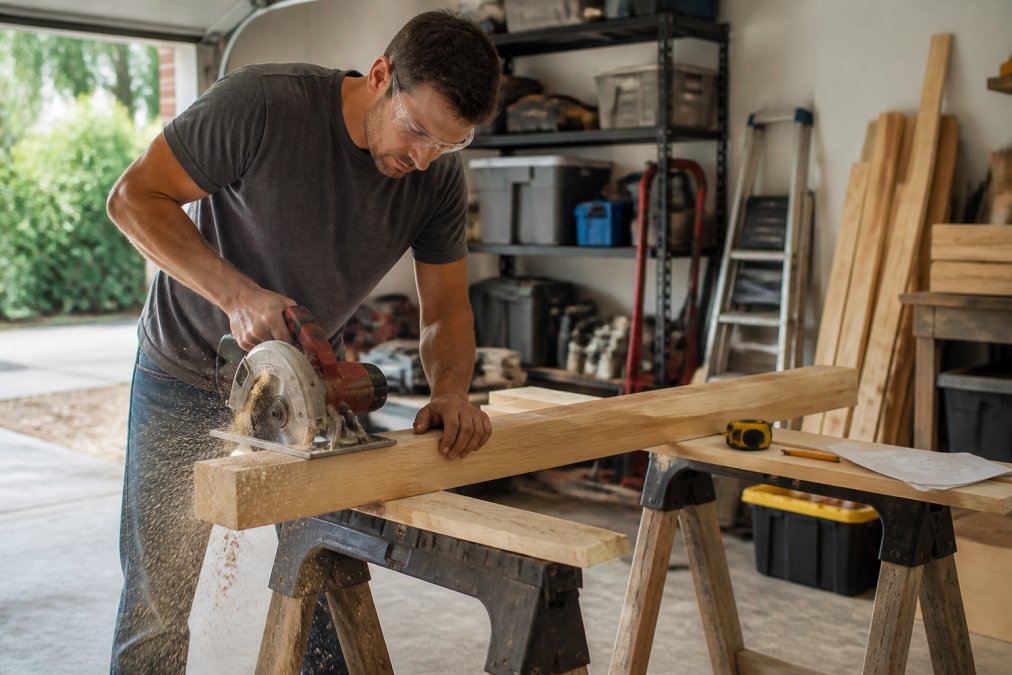
Frame assembly starts with the longest pieces first: two rails at your finished bench length and two end frames sized to your chosen depth. Cut everything to the list, then lay the pieces out on the floor before driving a single screw. Dry-fitting catches measurement errors while they're still free to fix.
Attaching the Legs and Joists
Attach the legs to the end frames with wood glue and two wood screws per joint, driven at a slight angle for grip. Connect the two end assemblies with your long rails to form a rigid box. Add joists across the top at 16-inch centers to support the work surface and stop it bowing under weight. Square the frame by measuring corner to corner: if the diagonals match, it's square; if not, rack it gently until they do.
Installing the Work Surface and Adding Storage
A plywood top is the practical choice: one sheet of 3/4-inch plywood gives a flat, replaceable surface that takes screws, paint, and abuse. Fasten it with screws every 8 inches along each joist, countersinking the heads so they don't catch on your work.
Storage is where a small bench earns its keep. Add a lower shelf framed from 2x4s and skinned with plywood, then slide freestanding units underneath instead of building drawers. A 5Tier Heavy Duty Foldable Metal Storage Rack With Wheels rolls under a 34-inch bench and pulls out when needed. For wall storage, 72" Adjustable Metal Shelving keeps tools off the work surface and within arm's reach.


Securing the Workbench to Wall Studs and Finishing
Anchor the bench to at least two wall studs with lag screws through the back rail. This stops the bench walking when you push a plane across it and removes side-to-side wobble without adding a brace. Find studs with a stud finder or by tapping, then mark centerlines before drilling pilot holes.
Finishing is optional but worth the hour. Sand the top and edges with 120-grit, then apply polyurethane or a wiping oil to shed glue and moisture. Sanding also knocks down sharp plywood edges that snag clothing and skin.
Conclusion
A small garage doesn't rule out a serious workbench, but it demands that you measure first, choose a design that respects your floor space, and set the height to your own body. Get those three decisions right and the build is a weekend of cutting, gluing, and screwing.
Superior Tool Garage and Outdoors carries the heavy-duty storage and tools that finish the job: rolling racks that tuck under the bench, adjustable shelving that clears your work surface, and tool kits with the fasteners and bits you'll reach for on day one. Shop the collection and build a bench that fits the garage you actually have, not the one in the photos.
Frequently Asked Questions
What is the best height for a garage workbench?
Stand straight and measure from the floor to your bent wrist, about 34 to 36 inches for most adults. For detail work like sanding or assembly, go 2 inches higher. For heavy clamping or planing, drop 2 inches lower so you can lean into the stroke. Test with a mock-up before cutting lumber.
How do you build a workbench in a small space?
Start with space-saving workbench plans that use a folding or wall-mounted design. Measure your garage bay first, then build the frame no deeper than 24 inches so you keep walking room. Anchor the bench to wall studs for stability, and keep the top clear by adding shelves or a rolling storage rack underneath.
Can I build a folding workbench for a small garage?
Yes. A folding bench uses hinged legs that swing flat against the wall when not in use, freeing up floor space for parking. Build the frame from 2x4 lumber, add a plywood top, and use heavy-duty hinges rated for the load. Add a locking brace so the legs stay rigid while you work.
What tools do I need to build a custom workbench?
At minimum: a circular saw or miter saw, a power drill with assorted drill bits, a measuring tape, a level, and clamps. Add safety glasses, wood glue, and wood screws for sturdy construction. A 50-piece household toolbox covers most of the hand tools, and a circular saw handles the 2x4 cuts.
A cramped garage punishes guesswork, and a bench that's too big or too low makes every project harder than it needs to be. Superior Tool Garage and Outdoors supplies the storage solutions and tools that make a small workspace function, from foldable rolling racks to adjustable metal shelving. Get started with Superior Tool Garage and Outdoors and turn that tight footprint into a workshop you'll actually use.