


Table of Contents
- What You'll Need Before You Start
- Small Workshop Layout Plans That Actually Work
- DIY Garage Wall Organization Step by Step
- Garage Tool Storage Ideas for Tight Spaces
- How to Organize a Small Garage Workshop: Floor-to-Ceiling Strategy
- Common Mistakes to Avoid When Setting Up Your Workshop
- Frequently Asked Questions
Last Updated: August 16, 2026
A cluttered garage workshop wastes time. Every minute hunting for a misplaced drill bit or stepping around extension cords is a minute you're not building, fixing, or creating. This guide walks you through exactly how to organize a small garage workshop, from planning through wall storage, tool organization, and floor-to-ceiling strategies. You'll find a step-by-step approach that works even in a single-car garage where the car still needs to fit.
The core principle: a well-organized small garage workshop is built around zones, vertical space, and deliberate tool placement.
What You'll Need Before You Start
Before moving a single shelf, gather a clear picture of your space. Skipping this step is the most common reason reorganizations fail, people buy storage first and discover it doesn't fit.
Start by gathering:
- A tape measure (measure perimeter, ceiling height, and door swing arcs)
- Masking tape to mark zones on the floor
- A notepad or phone for sketching a rough layout
- A full inventory of your current tools
Measure everything twice. Note electrical outlets, overhead lighting, and HVAC vents or water lines. These fixed constraints must work with your layout, not against it.
Then do a hard edit of your tools. Pull everything out and sort into three piles: keep, donate/sell, and trash. Many people own duplicates or store broken tools out of habit. A smaller, curated collection is dramatically easier to organize.
| Task | Why It Matters |
|---|---|
| Full room measurement | Prevents buying storage that doesn't fit |
| Outlet and vent mapping | Keeps workbench placement practical |
| Tool inventory and purge | Reduces clutter before organizing |
| Floor zone marking | Makes layout planning visual and adjustable |
Small Workshop Layout Plans That Actually Work
A small workshop layout plan assigns floor and wall space to specific tasks, tools, and movement patterns. The goal is to eliminate unnecessary steps and ensure frequently used tools are within arm's reach.
Most garages share the same constraints: one or two walls interrupted by doors or windows, limited overhead clearance, and a floor that doubles as parking. Working within those constraints requires a system.
The Zone Method: Splitting Your Garage by Task
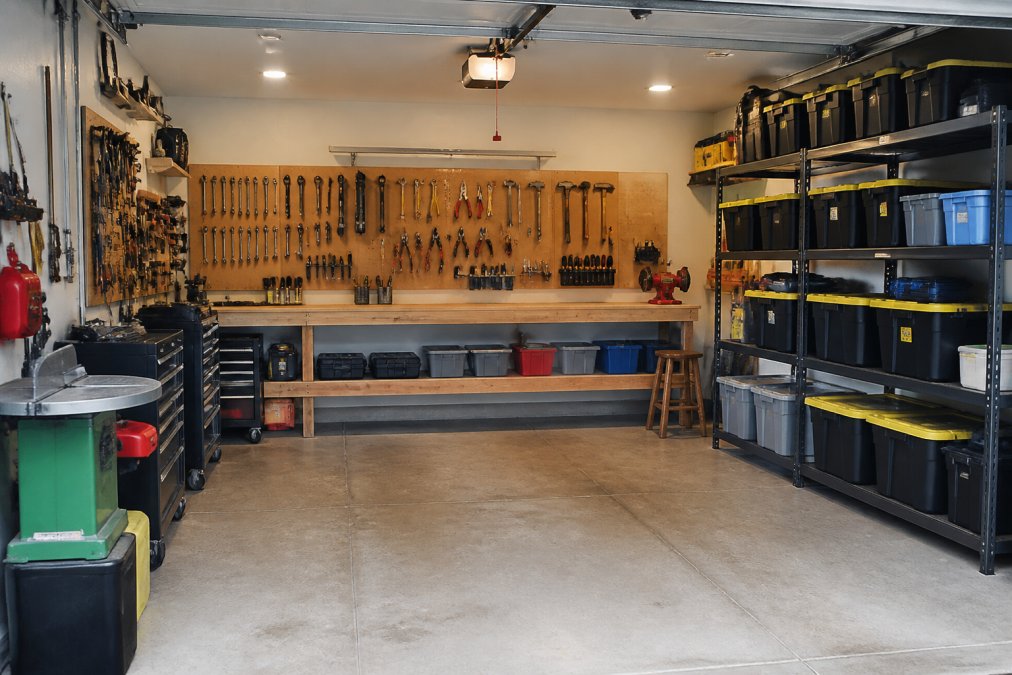
The zone method divides your garage into dedicated activity areas. Each zone contains the tools and surfaces needed for one type of task, so you never need to cross the garage mid-project.
A practical zone breakdown for most single-car garages:
- Primary work zone: Your workbench and the immediate 3-foot radius around it for assembly, cutting, and detailed work.
- Power tool zone: A dedicated area for larger stationary tools like a drill press, with nearby outlet access.
- Hand tool zone: Wall-mounted storage directly above or adjacent to the workbench.
- Material storage zone: Back corner or overhead space for lumber, pipe, or sheet goods.
- Consumables zone: Fasteners, adhesives, sandpaper, and small items in labeled bins on a shelf near the workbench.
The zone method works because it maps your physical movement to your actual workflow.
Workbench Placement: Where to Put It for Maximum Reach
The workbench is the anchor of any small garage workshop. The most effective position for most garages is along the back wall, centered or offset toward your dominant hand side.
The back wall is typically the longest uninterrupted surface, keeps the workbench out of the garage door path, and allows wall-mounted storage directly above. If your garage has a side entry door, avoid placing the workbench in front of it, that creates a traffic flow problem. Position the bench so natural light falls across the work surface rather than behind it.
A workbench depth of 24 to 30 inches is the practical sweet spot for a small garage. Deeper than that and you can't comfortably reach the back. Shallower and you run out of working surface fast.
DIY Garage Wall Organization Step by Step
Wall space is the most underused real estate in the average garage. Most homeowners stack things on the floor when they could mount them on the wall, freeing up floor space for actual work.
Start from the top and work down: overhead storage first, then upper wall storage, then mid-wall tool storage, then lower cabinets. This prevents installing something lower that blocks access to something higher.
According to OSHA's guidelines on workplace storage and organization, keeping walkways clear and storing items at appropriate heights reduces the risk of trips, falls, and strain injuries, principles that apply to home workshops as well.
Pegboards: The Fastest Wall Storage You Can Install
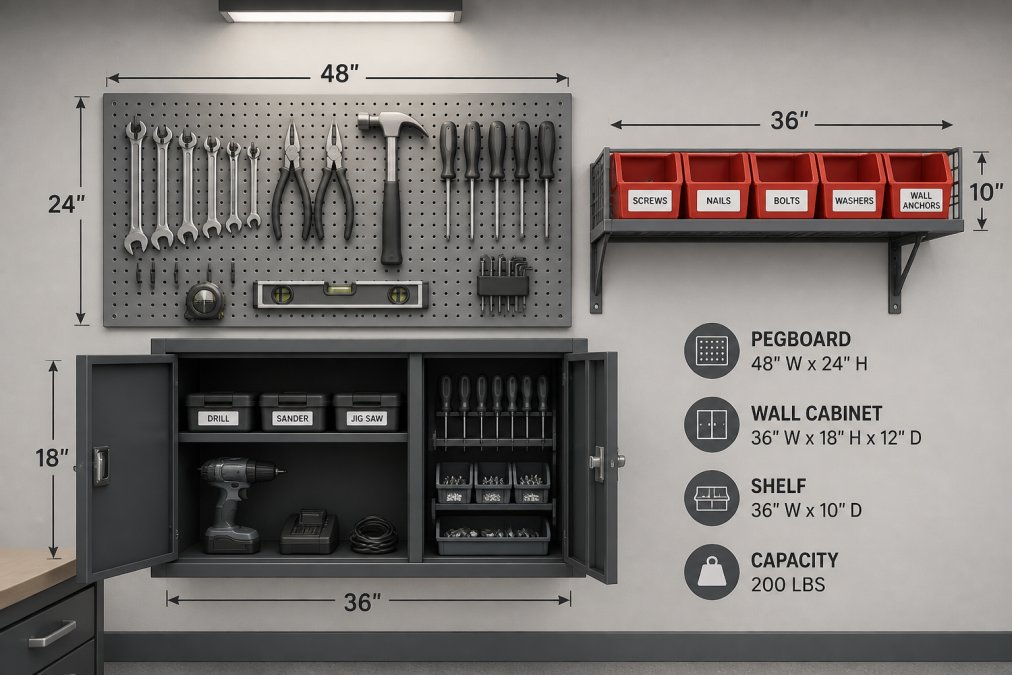
Pegboards are the most practical starting point for DIY garage wall organization. A pegboard accepts a variety of hooks, bins, and holders, letting you create a fully customized tool display that's visible, accessible, and rearrangeable.
Installation takes about an hour for a standard 4x8 foot section. The key detail: mount pegboard with a 1/2-inch to 3/4-inch standoff from the wall. Without that gap, the hooks have nothing to catch on. Use furring strips behind the panel when screwing into studs, or use a pegboard mounting kit.
Organize by frequency of use. Tools you reach for daily, hammer, tape measure, combination square, utility knife, go at eye level. Less-used items go higher or toward the edges. Outline each tool's silhouette with a paint marker so it's instantly obvious when something is missing.
Wall-Mounted Shelving and Track Systems
Above the pegboard and along walls without tool storage, adjustable track shelving systems offer the most flexible storage per square foot. A track system uses vertical metal rails screwed into wall studs, with adjustable brackets that slide at any height.
The advantage is flexibility: as your tool collection evolves, you can reconfigure shelf heights without drilling new holes. For a small garage where space priorities shift seasonally, that flexibility is genuinely useful.
For shelf depth, 12 inches works well for bins and small equipment. Go to 16 inches for larger items. Anything deeper tends to become a dumping ground.
According to the National Safety Council's home safety guidelines, shelving anchored to wall studs and rated for the intended load prevents tip-overs and collapses.
Garage Tool Storage Ideas for Tight Spaces
The best garage tool storage ideas for tight spaces share one characteristic: they go vertical. Floor space is precious. Wall space, overhead space, and cabinet door backs are almost always underused.
Most effective storage approaches for compact workshops:
- Magnetic tool strips: Mount a magnetic bar above your workbench for metal-handled tools, chisels, or drill bits.
- French cleat systems: A wall-mounted strip cut at 45 degrees accepts custom-built holders. You can make holders for virtually any tool shape and rearrange without drilling new holes.
- Cabinet doors as storage surfaces: The inside of a cabinet door can hold a pegboard panel, magnetic strip, or hooks.
- Under-shelf bins: Clip-on plastic bins mount to the underside of existing shelves, adding storage without consuming additional wall space.
- Rolling tool carts: For power tools and frequently used hand tools, a rolling cart that tucks under the workbench keeps everything accessible without permanently occupying floor space.
The system only works if returning tools is as easy as taking them out. If putting something away requires three steps, it won't get put away. Design your storage so the path of least resistance is also the correct path.
How to Organize a Small Garage Workshop: Floor-to-Ceiling Strategy
Organizing a small garage workshop effectively means treating every vertical foot as usable real estate. Most people use the bottom four feet of their garage walls and ignore everything above.
A floor-to-ceiling strategy works in three layers:
Overhead (ceiling to 7 feet): Ceiling-mounted storage platforms or overhead racks are ideal for seasonal items, rarely used equipment, or large materials like lumber. These items don't need daily access, so the extra reach is a fair trade for freed floor space. Always verify your ceiling structure before installing overhead storage and follow manufacturer load ratings.
Mid-wall (4 to 7 feet): This is prime real estate for active tool storage: pegboard, track shelving, and wall-mounted cabinets. Everything you use regularly should live here, at or near eye level.
Lower zone (floor to 4 feet): Base cabinets, rolling carts, and freestanding shelving units belong here. Under-bench storage, drawers, or pull-out bins are practical options most workbench setups underuse.
According to the U.S. Consumer Product Safety Commission's guidance on garage safety, proper storage of tools and equipment, particularly keeping heavy items low and securing tall storage units to walls, significantly reduces the risk of tip-over injuries.
The floor itself should be treated as a flow space, not a storage surface. The only things on the floor should be equipment too heavy or large to mount and the rolling cart that tucks under the bench.
Superior Tool Garage and Outdoors carries heavy-duty storage solutions designed specifically for this floor-to-ceiling approach, built to handle real workshop use without taking up excessive floor space.
Common Mistakes to Avoid When Setting Up Your Workshop
Most mistakes in setting up a small garage workshop come down to one root problem: people organize for the garage they have today rather than the workflow they actually need.
Buying storage before measuring. A shelving unit that's two inches too tall for your ceiling or a workbench that blocks the side door creates more problems than it solves.
Organizing tools by type instead of by task. Grouping all screwdrivers together sounds logical until you realize they're used in three different zones. Organize by task first, then by type within each zone.
Ignoring lighting. A well-organized workshop with poor lighting is still frustrating. Overhead fluorescent or LED shop lights, supplemented by a task light at the workbench, make a measurable difference in safety and work quality.
Treating the floor as overflow storage. The floor is for walking and working, not storing. If something lives on the floor permanently, it needs a wall mount, shelf, or rolling cart.
Over-organizing too early. Use the space for a few weeks first. Your actual workflow will reveal what needs to be close at hand and what can live in overhead storage.
The goal isn't a garage that looks good in photos. It's a garage where you can find any tool in under 30 seconds, work safely on any project, and put everything away without friction.
A disorganized workshop costs you time on every project. The strategies in this guide, zone-based layouts, vertical storage, deliberate workbench placement, and a floor-to-ceiling approach, work together to turn even the smallest garage into a genuinely functional workspace. Superior Tool Garage and Outdoors offers heavy-duty storage solutions and premium garage tools built to support exactly this kind of setup, from wall-mounted systems to workbench organization. Shop now to find the storage and tools that make your workshop work the way you need it to.
Frequently Asked Questions
How do you organize a small garage workshop when space is really limited?
Start by clearing everything out and sorting tools by how often you use them. Daily-use tools belong at arm's reach on a pegboard or workbench drawer. Seasonal or rarely used gear goes on overhead shelving or in labeled bins. The zone method, splitting your garage into distinct work, storage, and access areas, prevents clutter from creeping back. Even a one-car garage can function as a fully equipped small garage workshop with the right wall and vertical storage systems in place.
What is the best way to store tools in a small garage?
Wall-mounted pegboards and magnetic tool strips keep hand tools visible and off the workbench. A rolling tool cabinet gives you drawer storage that moves where you need it. For power tools, dedicated wall brackets or a lockable cabinet protect them and free up floor space. Label every drawer and bin so tools go back where they belong. The goal is a system where you can grab any tool in under 10 seconds, that's the real test of good garage tool storage.
How can I maximize space in a small garage workshop without a big budget?
Focus on vertical space first, most garages have 8 to 10 feet of wall height that goes completely unused. Install a pegboard above your workbench, add wall-mounted shelving above head height for bulk storage, and use ceiling-mounted racks for lumber or ladders. Fold-down workbenches attach to the wall and fold flat when not in use, reclaiming several square feet instantly. You don't need to replace everything at once, fill gaps in your current setup before buying new storage.
Do I need to replace all my existing tools and storage, or can I just add to what I have?
You rarely need to start from scratch. Assess what you already own: if your current shelving holds weight safely and fits your space, keep it. Add targeted pieces, a pegboard here, a wall track there, to fill the gaps. Replace individual items only when they're genuinely unsafe, broken, or too small for your needs. A smart small garage workshop upgrade is usually about adding organization layers to what already works, not wholesale replacement.