


Table of Contents
- How Long Does Garage Floor Epoxy Last: Realistic Timelines
- Surface Preparation: The Foundation of Floor Durability
- Garage Floor Epoxy Maintenance Tips for Extended Life
- Signs of Epoxy Floor Failure and When to Repair
- Polyaspartic Garage Floor Coating Reviews 2026
- Climate and Humidity: How Environment Affects Epoxy
- Curing Time vs. Lifespan: What You Need to Know
- Repairability vs. Replacement: Cost-Per-Year Analysis
- Frequently Asked Questions
Last Updated: September 20, 2026
How Long Does Garage Floor Epoxy Last: Realistic Timelines
When homeowners invest in garage floor epoxy, they're asking one fundamental question: how long does garage floor epoxy last? The honest answer depends less on the product itself and more on how you install it, maintain it, and what your garage environment throws at it.
Most professionally installed epoxy systems last between 10 and 20 years. DIY kits often fail much sooner, sometimes within 3 to 5 years, because the installation process demands precision that's easy to miss without experience. But here's what matters: those timelines aren't fixed. They're starting points. The real durability of your floor coating hinges on substrate preparation, climate conditions, maintenance habits, and whether you chose the right system for your specific use case.
Epoxy longevity isn't magic; it's mechanics. Getting the foundation right can help a floor outlast expectations. Skipping critical steps can cause even premium products to fail prematurely.
Professional Installation vs. DIY Kits
Professional installers deliver longer-lasting results because they control every variable. They test concrete moisture levels before starting, grind or acid-etch the surface to the right profile, apply proper primer coats, and manage cure times in controlled conditions. This attention to detail translates directly into floor lifespan.
DIY kits promise simplicity, but they often fail because homeowners skip or rush critical steps. Moisture testing gets skipped. Surface prep becomes a quick sweep instead of mechanical grinding. Temperature control during cure goes unmonitored. Each shortcut compounds, and the coating delaminates or blisters within months.
The cost difference between professional installation and a DIY kit might seem significant upfront, but when you calculate cost-per-year, professionals often win. A floor that lasts 15 years costs less annually than one that fails at year 3, even if the initial installation was cheaper.
Factors Affecting Epoxy Longevity
Three factors determine whether your epoxy lasts 5 years or 20: the coating system itself, the substrate condition, and how you use the space.
Coating system quality matters. Standard epoxy resins are vulnerable to UV light and will yellow over time, especially in garages with natural light. Polyaspartic topcoats resist UV damage better and cure faster, which reduces the window for installation errors. The thickness of application, typically 2 to 3 mils for base coats and 1 to 2 mils for topcoats, directly affects durability. Thinner applications fail sooner.
Substrate condition is foundational. Concrete that holds moisture will cause epoxy to blister and peel, sometimes within weeks. Concrete with high porosity absorbs moisture from below. Cracks and spalling create weak points where coating eventually separates. A concrete slab with proper slope for drainage and no moisture vapor transmission problems can support epoxy for 15+ years. The same coating on compromised concrete might fail in 3.
Usage patterns accelerate wear. Hot tire pickup, where tires transfer heat to the floor, causes localized softening of the epoxy. Chemical spills, especially solvents and degreasers, can eat through coating. Heavy impact from dropped tools or equipment breaks the surface. A climate-controlled garage with light foot traffic and careful maintenance extends epoxy life significantly compared to an uninsulated space with heavy vehicle use.
Surface Preparation: The Foundation of Floor Durability
Surface preparation determines whether epoxy bonds to concrete or simply sits on top waiting to fail. Most professionals spend 40% of their installation time on prep work. This isn't excessive, it's essential.
Substrate Moisture Testing and Concrete Prep
Concrete absorbs moisture from the ground. If you apply epoxy to a damp slab, moisture vapor continues moving upward, creating pressure between the coating and substrate. The epoxy eventually blisters, peels, and fails.
Test for moisture before any coating work. Calcium chloride tests or relative humidity meters reveal whether the concrete is ready. Most epoxy manufacturers require moisture levels below 3 pounds per 1,000 square feet per 24 hours. If your slab exceeds this, you need either a moisture barrier primer or a polyaspartic system that tolerates higher moisture levels better.
Concrete prep involves removing all contaminants: oil, grease, old sealers, dust, and loose concrete. A simple pressure wash isn't enough. Mechanical grinding or acid etching creates the surface profile that epoxy needs to bond mechanically.
Mechanical Grinding vs. Acid Etching
Mechanical grinding uses diamond-tipped equipment to remove the top layer of concrete and create texture. It's fast, controllable, and produces consistent results. Grinding also removes old coatings, oils, and contaminants in one step. The downside: it's loud, creates dust, and requires professional equipment.
Acid etching uses diluted hydrochloric acid to dissolve the concrete surface slightly, creating porosity. It's cheaper and can be done with minimal equipment. But acid etching is less predictable. Concrete density varies, so etch times must be adjusted. Incomplete rinsing leaves acid residue that interferes with bonding. Over-etching weakens the concrete surface.
For durability, mechanical grinding produces better long-term results. The controlled surface profile ensures consistent epoxy bond strength across the entire floor.
Garage Floor Epoxy Maintenance Tips for Extended Life
Maintenance is where most homeowners either extend their floor's life significantly or watch it deteriorate prematurely.
Daily and Weekly Cleaning Routines
Dirt and grit act as abrasives. Daily sweeping removes these particles before they scratch the surface. Weekly wet cleaning with mild soap and water keeps the coating clean without degrading it. Avoid acidic cleaners, solvents, and degreasers unless the epoxy is specifically rated for chemical resistance.
Salt and road chemicals from vehicles tracked inside accelerate degradation. If you live in a cold climate, a boot tray or entrance mat reduces salt exposure. Spills, especially fuel, oil, and solvents, should be cleaned immediately. The longer they sit, the deeper they penetrate.
Preventing Hot Tire Pickup and Chemical Damage
Hot tire pickup happens when tires transfer heat to the epoxy surface, softening it temporarily. Over time, this repeated thermal stress causes localized wear. You can't eliminate hot tires, but you can reduce impact by parking vehicles in a cooler area of the garage or allowing tires to cool before parking.
Chemical resistance depends on the epoxy formulation. Standard epoxy offers moderate resistance. Polyaspartic and polyurea coatings handle chemicals better. If you work on vehicles or store fuel, solvents, or degreasers, choose a chemical-resistant system and clean spills immediately.
Signs of Epoxy Floor Failure and When to Repair
Not all damage requires complete recoating. Understanding what you're seeing helps you decide between repair and replacement.
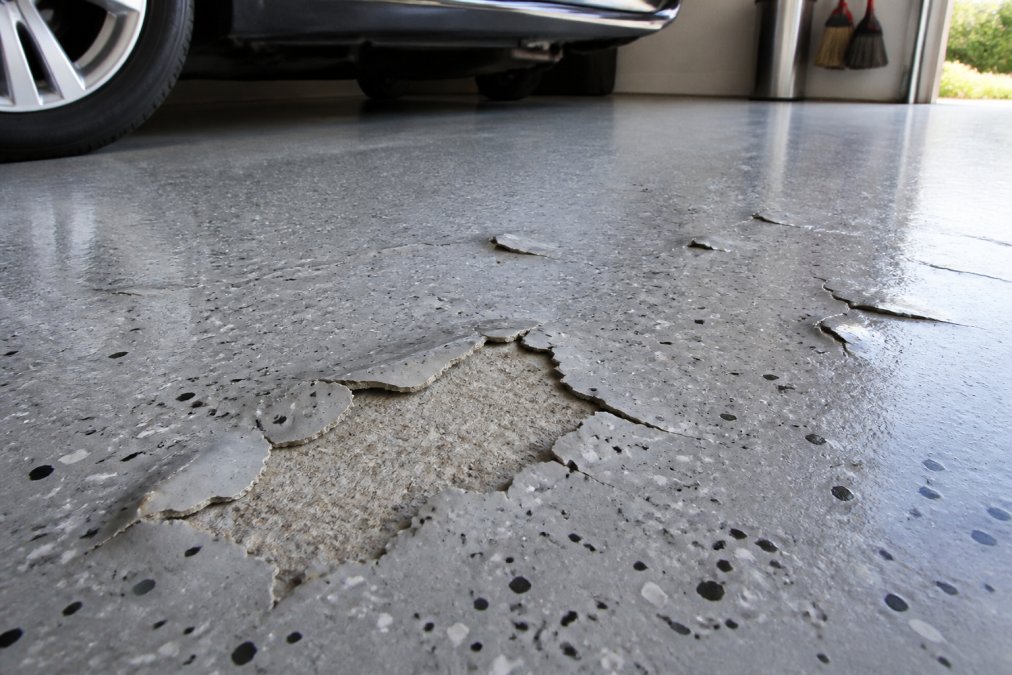
Peeling, Blistering, and Delamination
Peeling indicates poor adhesion between epoxy and concrete. This usually stems from inadequate surface preparation or moisture problems. Once peeling starts, it spreads. Repair involves grinding away the failed coating and reapplying epoxy to the affected area. If peeling covers more than 20% of the floor, full recoating is often more cost-effective than patching.
UV Yellowing and Abrasion Resistance Breakdown
Standard epoxy yellows when exposed to UV light. This is cosmetic initially, the coating still protects the concrete. But yellowing often signals UV degradation of the resin itself, which compromises durability. Polyaspartic topcoats resist yellowing much better.
Polyaspartic Garage Floor Coating Reviews 2026
Polyaspartic coatings have become increasingly popular as an alternative to standard epoxy. They cure faster, sometimes in 24 hours instead of 7 days, which reduces the installation window where the floor is vulnerable to contamination. They also resist UV yellowing and handle temperature extremes better than epoxy.
Climate and Humidity: How Environment Affects Epoxy
Your local climate directly impacts how long garage floor epoxy lasts. Hot, humid environments accelerate degradation. Moisture vapor transmission increases, which stresses the coating. High temperatures soften epoxy slightly, making it more susceptible to tire pickup and impact damage.
Curing Time vs. Lifespan: What You Need to Know
Curing time is how long the coating takes to harden. Lifespan is how long it lasts. These aren't the same thing, and confusing them leads to premature failure.
Repairability vs. Replacement: Cost-Per-Year Analysis
When your garage floor epoxy shows signs of failure, you face a choice: repair or replace. The right decision depends on the extent of damage and how much life remains in the coating.
| Failure Mode | Cause | Repair or Replace | Timeline |
|---|---|---|---|
| Peeling | Poor adhesion, surface prep | Repair if <20% coverage | Immediate |
| Blistering | Moisture vapor transmission | Repair + moisture barrier | Immediate |
| Yellowing | UV exposure | Topcoat reapplication | Optional |
| Delamination | Substrate failure, moisture | Replace | Immediate |
| Abrasion | Traffic wear | Topcoat or replace | When widespread |
Frequently Asked Questions
What are the common signs that garage floor epoxy is failing?
Peeling, blistering, and delamination are the most visible failure signs. Peeling typically starts at edges or high-traffic areas. Blistering appears as bubbles trapped under the coating, usually from moisture vapor or improper substrate preparation. Yellowing and loss of gloss indicate UV damage and reduced abrasion resistance. If you notice any of these, the epoxy's protective barrier is compromised and replacement should be considered.
How does climate and humidity affect how long garage floor epoxy lasts?
High humidity and temperature fluctuations accelerate epoxy degradation. In humid climates, concrete moisture vapor can cause blistering and delamination if a proper moisture barrier wasn't installed. Freeze-thaw cycles in cold climates stress the coating through expansion and contraction. Consistent temperature control extends epoxy lifespan significantly. Garages in dry climates typically see longer service life than those in coastal or humid regions.
Is professional installation worth it compared to DIY epoxy kits?
Professional installations often last longer than DIY applications. Professionals typically ensure proper substrate preparation, moisture testing, and correct application ratios, critical steps that DIY installers might overlook. Professional-grade materials and equipment can also provide better coverage and bond strength. The upfront cost difference for professional installation can be offset by a longer lifespan and fewer repairs, making it a potentially better long-term investment for many homeowners.
How often should you maintain or re-coat garage floor epoxy?
Regular maintenance every 1-2 weeks extends epoxy life significantly. This includes sweeping debris, cleaning spills promptly, and avoiding harsh chemicals. A topcoat refresh or full re-coat may be needed every 5-7 years depending on traffic and environmental conditions. Polyaspartic coatings, which cure faster and offer better UV stability than standard epoxy, may extend intervals between maintenance. Monitor your floor for signs of wear and address them early to avoid costly replacement.