


Table of Contents
- What You'll Need Before Starting
- Step 1: Clean and Degrease Your Concrete Substrate
- Step 2: How to Test Concrete for Moisture
- Step 3: Repair Concrete Cracks Before Epoxy
- Step 4: Garage Floor Acid Etching vs Grinding
- Step 5: Concrete Floor Grinding Tools and Equipment
- Step 6: Final Surface Preparation and Safety
- Common Mistakes to Avoid When Prepping Concrete for Epoxy
- Frequently Asked Questions
Last Updated: October 2, 2026
What You'll Need Before Starting
Learning how to prepare garage floor for epoxy 2026 isn't complicated, but it does require the right equipment and materials. Before you begin, gather a concrete cleaner or degreaser, a pressure washer or stiff-bristled brush, a moisture testing kit, concrete patching compound for cracks, and either a concrete grinder with diamond cup wheels or muriatic acid for etching. You'll also need safety equipment: a respirator, gloves, eye protection, and proper ventilation setup. Having a concrete surface profile (CSP) gauge on hand to verify you've achieved the correct surface texture is recommended. The right tools make the difference between a coat that lasts years and one that peels within months.
Most homeowners underestimate how much surface preparation determines epoxy success. A pristine epoxy application can't save a poorly prepared substrate. Conversely, meticulous prep work makes even a basic epoxy coating perform exceptionally well. This is where your effort pays off.
Step 1: Clean and Degrease Your Concrete Substrate
Your concrete substrate must be completely clean before any other prep work begins. Oil stains, dirt, dust, and residue prevent epoxy from bonding properly to the concrete surface.
The cleaning step removes surface contaminants that would otherwise create weak points in your epoxy coating. Even microscopic debris can cause adhesion failure. After pressure washing, allow the concrete to dry completely, typically 24-48 hours depending on humidity and temperature.
Pay special attention to areas where vehicles have been parked, as these accumulate oil and grease that resist standard cleaning. For severe stains, a concrete degreaser designed for garage floors works better than general-purpose cleaners. Once dry, run your hand across the surface. If you feel any slickness or residue, the concrete isn't clean enough yet.
Step 2: How to Test Concrete for Moisture
Moisture is the silent killer of epoxy coatings. Even small amounts of moisture vapor transmission through the concrete substrate will cause epoxy to bubble, blister, and eventually peel. Testing before you prepare your floor prevents costly failure after application.
Plastic Sheet Test Method
The simplest test requires only a plastic sheet and patience. Cut a piece of clear plastic (6x6 inches minimum) and tape all four edges to the concrete floor, creating an airtight seal. Wait 24 hours without disturbing it.
The plastic sheet test is free and reliable for detecting obvious moisture problems. However, it doesn't measure moisture vapor transmission rates precisely.
Moisture Vapor Transmission Rates
Epoxy manufacturers typically specify a maximum moisture vapor transmission (MVT) rate, usually 3-5 pounds per 1000 square feet per 24 hours. Test kits measure this directly by placing a specialized dish on the concrete and measuring weight gain over time.
Most garage floors in humid climates will show some moisture. The question isn't whether moisture exists, but whether it exceeds what your chosen epoxy can tolerate. Check your epoxy product specifications before testing so you know your target threshold.
Step 3: Repair Concrete Cracks Before Epoxy
Cracks in the concrete substrate must be repaired before epoxy application. Small hairline cracks (less than 1/8 inch wide) can sometimes be sealed with epoxy itself, but larger cracks need concrete patching compound.
Clean out each crack with a wire brush or compressed air to remove loose debris. For cracks wider than 1/4 inch, use a concrete crack filler or self-leveling polyurethane sealant.
The goal is a smooth, continuous surface with no voids or loose material.
Step 4: Garage Floor Acid Etching vs Grinding
This is where many homeowners face their biggest decision: acid etching or mechanical grinding. Both methods open the concrete pores and create surface profile suitable for epoxy bonding, but they work differently and have distinct advantages and drawbacks.
Mechanical Grinding with Diamond Cup Wheels
Mechanical grinding uses a concrete grinder equipped with diamond cup wheels to remove a thin layer of concrete surface. This creates a consistent, controllable surface profile and simultaneously removes any remaining surface contaminants, sealers, or coatings. Grinding produces significant dust, requiring proper dust control and respiratory protection. The process takes 2-4 hours for a typical two-car garage, depending on the concrete condition and grinder power.
Grinding is faster than acid etching and produces cleaner results on concrete that's been sealed or painted previously. It's also safer than acid etching because you're not handling caustic chemicals. The downside is equipment cost and the physical effort required. Rental grinders are widely available, making this accessible for most homeowners.
Acid Etching with Muriatic Acid
Acid etching uses muriatic acid (hydrochloric acid) to chemically etch the concrete surface. The acid reacts with the concrete, creating a porous surface ready for epoxy.
However, acid etching requires careful chemical handling. Muriatic acid is caustic and produces harmful fumes. You must wear a respirator, gloves, and eye protection, and ensure excellent ventilation. The process is slower than grinding, typically taking 4-6 hours for a garage floor.
Achieving the Right Concrete Surface Profile
The concrete surface profile (CSP) measures how rough the surface is. Most epoxy manufacturers require CSP 2 or CSP 3, roughly equivalent to fine sandpaper or light grinding.
Mechanical grinding gives you better control over CSP because you can adjust grinder speed and pressure. Acid etching produces variable results depending on concrete age, moisture, and acid strength. For this reason, grinding is often the more reliable choice for achieving consistent results.
Screwdriver Set Insulated Magnetic Screwdrivers 100 pcs →
Step 5: Concrete Floor Grinding Tools and Equipment
Concrete floor grinding tools range from simple to complex, and choosing the right equipment affects both your results and your effort level.
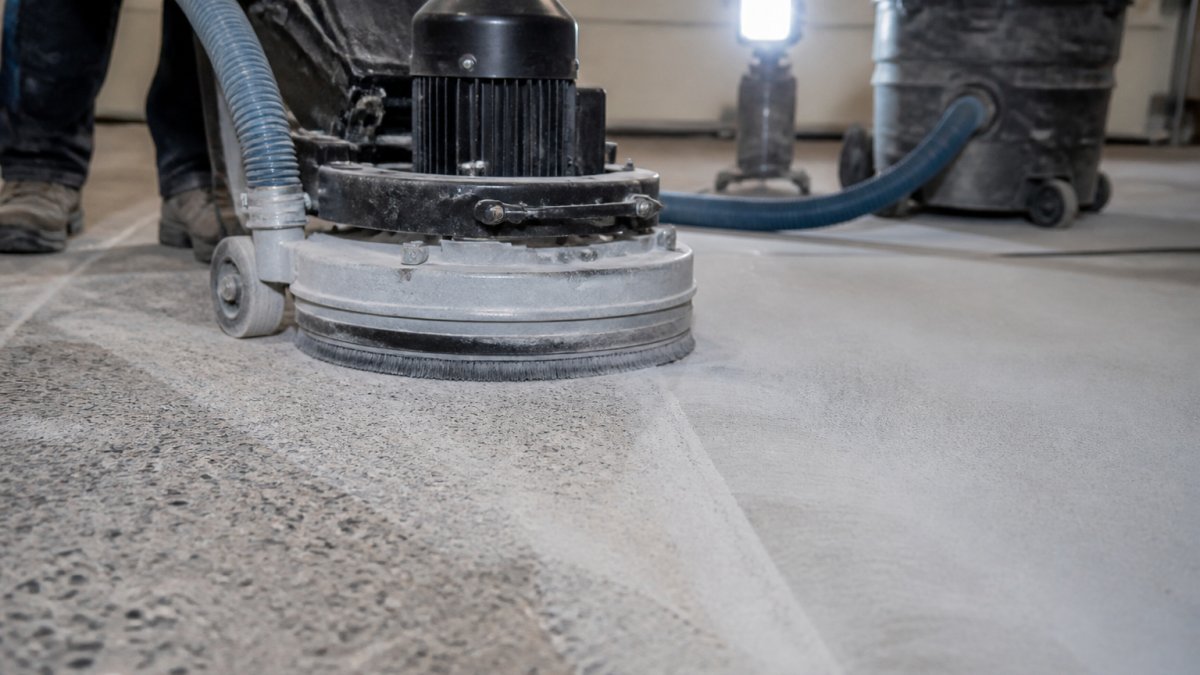
A concrete grinder with diamond cup wheels is the standard tool for this job. Handheld grinders work for small areas but are physically demanding for a full garage floor.
Dust control is critical when grinding concrete. A grinder with a built-in dust collection system or one you can connect to a shop vacuum dramatically reduces airborne dust.
Tool Rental vs. Purchase
Renting a concrete grinder makes sense for most homeowners. A quality walk-behind grinder costs $800-2000 to buy but rents for $40-60 per day. You'll need it for one day, maybe two for a large garage. Over five years, you might use it twice more, making purchase economically irrational.
Purchase makes sense only if you plan multiple epoxy projects, own a rental property business, or have other concrete work planned. For occasional use, rental is the practical choice.
Environmental Disposal of Chemicals
If you choose acid etching, you'll have acid-contaminated water that requires proper disposal. Never pour acid-contaminated water down a drain or onto soil. Most municipalities have hazardous waste collection facilities that accept small quantities of acid.
Concrete dust from grinding should also be collected rather than left to settle. Sweep or vacuum dust into bags and dispose of it with regular trash, or check local regulations for concrete waste disposal.
Step 6: Final Surface Preparation and Safety
Once you've completed how to prepare garage floor for epoxy 2026 by cleaning, testing, repairing, and grinding or etching your concrete, do a final inspection. Walk the entire floor and look for any remaining dust, debris, or smooth spots you might have missed. Use a damp mop to remove all dust from grinding or acid etching. Let the floor dry completely before applying epoxy.
PPE and Respiratory Protection
Proper personal protective equipment is non-negotiable during concrete preparation. Wear a respirator rated for concrete dust (N95 or better for grinding, or a cartridge respirator for acid fumes). Safety glasses protect your eyes from splashing acid or grinding debris.
If you're grinding, ear protection is also important, concrete grinders produce 80-90 decibels of noise. Proper PPE prevents respiratory damage, chemical burns, and eye injuries that could affect you for years after a single day of prep work.
Environmental Disposal of Chemicals
Acid-contaminated water and concrete dust both require responsible disposal. Never pour acid down a drain without neutralizing it first. Baking soda neutralizes muriatic acid, add it gradually until fizzing stops, then dispose of the neutralized liquid according to local regulations. Concrete dust should be swept up and bagged rather than left to become airborne contamination.
Common Mistakes to Avoid When Prepping Concrete for Epoxy
The most common mistake is skipping or rushing the cleaning step.
Another frequent error is ignoring moisture testing.
Uneven surface profile causes adhesion problems.
Applying epoxy to damp concrete is a guarantee of failure.
Finally, underestimating the physical effort leads many homeowners to hire professionals after starting themselves.
Preparing your garage floor properly transforms epoxy from a risky investment into a durable, attractive upgrade that lasts years.
Frequently Asked Questions
What is the most important step when preparing a garage floor for epoxy?
Moisture testing is critical. If your concrete holds excess moisture, epoxy will fail to bond and delaminate within months. Use the plastic sheet test: tape a 2-foot plastic sheet to the floor for 24 hours. If condensation forms underneath, your moisture vapor transmission rate is too high, and you must address it before coating. Skipping this step is the single most common reason epoxy preparation fails.
Do I need to grind my garage floor before applying epoxy?
Yes. Your concrete substrate must reach a specific surface profile (CSP 2 or 3) for proper bonding. Grinding with a diamond cup wheel removes contaminants, opens pores, and creates mechanical adhesion. Acid etching is an alternative, but grinding is more reliable for removing efflorescence and old sealers. Without this step, your epoxy coating will not adhere properly and will chip or peel.
How long does the preparation process take for a standard 2-car garage?
Plan 2-4 days total. Cleaning and degreasing takes 4-8 hours. Moisture testing requires 24 hours of waiting time. Grinding or etching takes 6-12 hours depending on floor condition and method. Repairs and final cleanup add 4-8 hours. Weather and concrete condition affect timing. Always allow extra time for unexpected cracks or efflorescence removal.
What tools are required for professional-grade garage floor preparation?
You'll need a pressure washer (2500+ PSI), degreaser, diamond cup grinding wheel, moisture meter, crack-filling materials, acid or muriatic acid (if etching), PPE including a respirator, eye protection, and gloves. Many DIYers rent grinding equipment rather than purchase. Plastic sheeting and safety equipment complete the essentials for a thorough, professional-grade prep.