


Last Updated: October 31, 2026
Quick Summary
Understanding torque wrench calibration means knowing it is a documented comparison between your wrench's output and a known reference standard, not a workshop check. Calibration produces a record with the reference standard, test points, tolerance, and date, while adjustment and verification are separate actions.
- Calibration is a documented comparison; adjustment physically changes the wrench and verification is a quick tolerance check.
- A home accuracy test uses a vise, known weight, and tape measure, with torque equal to weight times lever arm.
- A common baseline interval is every 5,000 cycles or every 12 months, whichever comes first.
- Recalibrate immediately after a drop, overload, high-setting storage, repair, or failed verification.
- Store every torque wrench at its lowest setting to prevent spring drift over time.
Table of Contents
- Calibration, Adjustment, and Verification: What Beginners Need to Know
- How Torque Wrench Accuracy Affects Fasteners and Safety
- Running a Torque Wrench Accuracy Test at Home
- Torque Wrench Calibration Tools and Test Setups
- Setting Your Torque Wrench Calibration Frequency
- Torque Wrench Storage Best Practices
- Pick the Right Torque Wrench for Your Garage
- Frequently Asked Questions
Calibration, Adjustment, and Verification: What Beginners Need to Know
Most people use the words calibration, adjustment, and verification as if they mean the same thing. They don't, and mixing them up is the fastest way to trust a wrench you shouldn't.
Here's the distinction that matters most: you can verify a wrench without calibrating it, but you cannot call a verification a calibration. Only one of those produces a record you can rely on later.
Why a Workshop Check Is Not a Calibration Record
A workshop check tells you whether a wrench is roughly in the ballpark. It does not tell you how far off it is, and it leaves no paper trail.
Teng Tools draws this line clearly in its guide to calibrating a torque wrench. A do-it-yourself check is not the same as a formal calibration record.
So what does a real record include? At minimum:
- The reference standard used and its traceability
- The test points and the readings at each
- The tolerance applied
Without those four items, you have a gut feeling, not documentation.
How Torque Wrench Accuracy Affects Fasteners and Safety
A torque wrench that reads high or low changes the clamp load on every bolt you touch. Too little torque and fasteners can work loose under vibration.
The stakes climb fast on safety-critical parts. Head bolts, suspension components, and wheel lugs all depend on hitting a spec within tolerance.
Beginners often assume a click means "done." It doesn't. If you are building out a starter kit, our guide to essential tools for car maintenance beginners puts torque accuracy in the context of the other basics you need.
Running a Torque Wrench Accuracy Test at Home
You can run a basic accuracy test at home with a vise, a known weight, and a tape measure. It won't replace a lab calibration, but it will tell you whether a wrench has drifted badly.
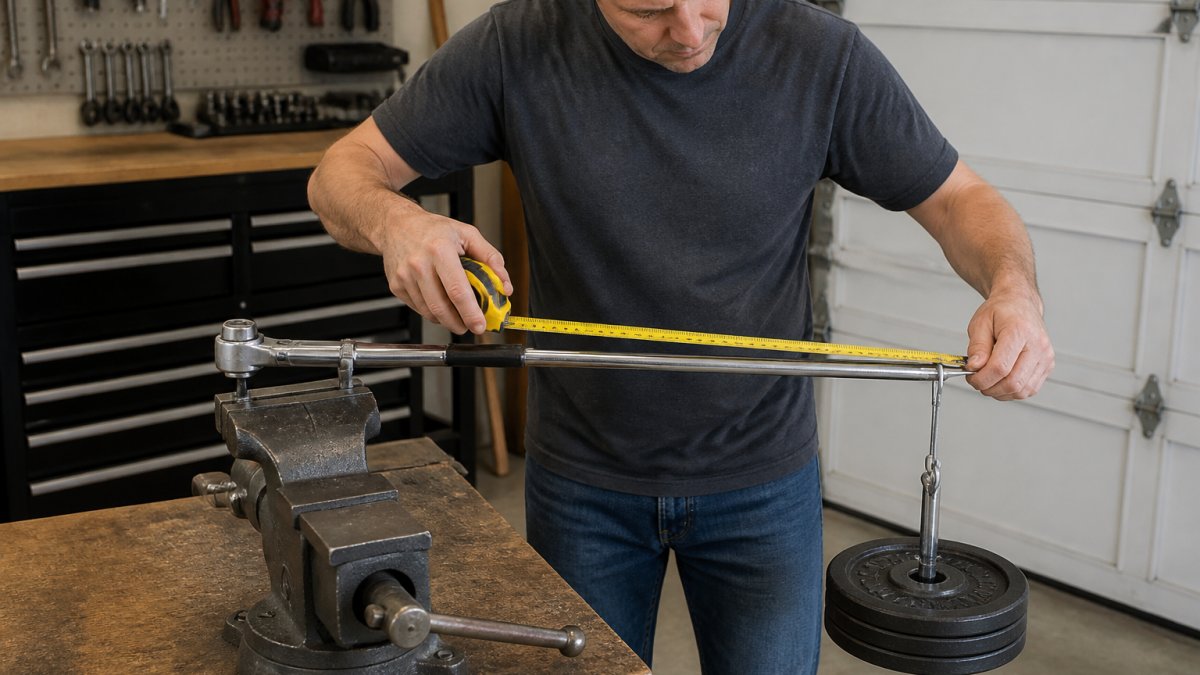
Set up safely and slowly. The goal is a controlled pull, not a yank.
The Known Load and Lever Length Method
This method applies a known mass at a known distance from the square drive.
In U.S. customary units, torque is usually expressed in pound-inches (lb-in) or pound-feet (lb-ft). One pound-foot equals 12 pound-inches. If you hang a weight in pounds at a lever arm measured in inches, the calculation is:
Torque (lb-in) = weight (lb) × lever arm (in)
For example, a 20 lb weight hung 12 inches from the drive center applies 240 lb-in, or 20 lb-ft. A 10 lb weight at 24 inches applies the same 240 lb-in.
Follow these steps:
- Clamp the wrench's square drive in a vise so the handle sits level. Use soft jaws or a rag to avoid marring the drive.
- Measure from the drive center to the point where you'll hang the weight. That distance is your lever arm. Measure to the center of the weight's attachment point, not the edge of the handle.
- Hang a known weight at that mark. A dumbbell, a bucket filled with a measured amount of water (one gallon of water weighs about 8.34 lb), or a calibrated weight all work.
- Calculate your target torque using the formula above.
- Set the wrench just below the calculated torque and slowly raise the handle until it clicks.
- Note the setting at which the click occurs and compare it to your target.
Watch out: this test only works if the weight hangs straight down and the pull stays smooth.
Where Home Testing Breaks Down
A home check has real limits, and beginners should know them before trusting the result.
- Lever arm measurement error. A quarter-inch mistake on a 12-inch arm is about 2 percent error before you even start. Measure carefully and mark the spot.
- Weight accuracy. A gym dumbbell may be off by a few percent from its stamped value. A bucket of water is only as accurate as your measuring container.
- Friction and angle. The handle must be horizontal at the click point, and the pull must be perpendicular to the arm. Any side load or angle reduces the effective torque.
When to Skip the Home Test
Skip the DIY check and go straight to a calibration service if any of these apply:
- The wrench is used on safety-critical fasteners such as head bolts, suspension components, or wheel lugs.
- The wrench has been dropped, overloaded, or stored at a high setting for a long period.
- You need documentation for liability, warranty, or workplace requirements.
A professional calibration uses a traceable reference, controlled conditions, and documented results. That is a different product from a home verification, and the price difference reflects it. A home check costs only your time and the weight you already own, but it does not produce a calibration record.
Torque Wrench Calibration Tools and Test Setups
Serious calibration needs a proper reference. A known load is what makes a reading meaningful.
What you actually need depends on how often you calibrate:
- Occasional home checks: a vise, a known weight, and a tape measure
- Regular shop use: a torque tester with a digital readout
- Professional records: a traceable standard plus documentation software
The key is matching the reference's accuracy to the job. You can browse the full tools category to compare testers and setups. A tester that is less accurate than the wrench tells you nothing useful.
Setting Your Torque Wrench Calibration Frequency
There is no single rule that fits every wrench. A common starting point is every 5,000 cycles or every 12 months, whichever comes first, according to Micro Precision's calibration guidance.
The better approach is to build an interval from the factors that actually affect your wrench. Most calibration programs use a combination of time, usage, and event-based triggers rather than a single schedule.
The Three Triggers
Time-based. Even a wrench that sits in a case can drift as the spring relaxes and lubricants age. An annual check is a common floor for shop and professional use.
Usage-based. Cycle count matters more than calendar time for busy shops. A production environment might calibrate every few thousand cycles, while a home mechanic might never hit that number in a year.
Event-based. Any of these should trigger an immediate recalibration regardless of schedule:
- A drop onto a hard surface
- An overload or use as a breaker bar
- Storage at a high setting for an extended period
How to Decide Your Interval
Use the baseline as a starting point, then adjust based on your situation:
- Heavy daily use: shorten the interval and check more often. A shop tightening hundreds of fasteners a day may calibrate quarterly.
- Occasional weekend projects: the annual check is usually enough, and some home users go longer if the wrench is stored properly.
- After a drop or overload: recalibrate immediately, regardless of schedule.
Reading a Calibration Certificate and Tolerance Results
A calibration certificate tells you how far off your wrench was at each test point. Look for the tolerance band and whether the readings fell inside it.
If a certificate shows a wrench drifting toward the edge of tolerance, that is your signal to shorten the next interval.
Also check the stated measurement uncertainty on the certificate. A result that passes by a margin smaller than the uncertainty is effectively inconclusive.
What to Do When a Wrench Is Out of Tolerance
An out-of-tolerance result is not the end of the wrench. The typical next steps are:
- Ask the calibration service to adjust the wrench and recalibrate it.
- If adjustment cannot bring it back into spec, replace it.
- Review any fasteners tightened since the last known-good calibration and decide whether they need to be rechecked.
- Shorten the interval going forward if the drift was larger than expected.
That last step is where most beginners stop too early. The interval is not a fixed number you pick once. It is a decision you revisit every time you get a result back.
Here are the calibration triggers and interval guidance the article lays out.
| Trigger | What it means | Example from the article |
|---|---|---|
| Time-based | Drift from spring relaxation and aging lubricants | Annual check common; home users may stretch to 12 to 24 months |
| Usage-based | Cycle count matters more than calendar time | Production shops may calibrate every few thousand cycles |
| Event-based | Immediate recalibration regardless of schedule | Drop, overload, high-setting storage, repair, failed verification |
| Baseline starting point | Common default interval | Every 5,000 cycles or every 12 months, whichever comes first |
| Heavy daily use | Shorten the interval and check more often | Shop tightening hundreds of fasteners a day may calibrate quarterly |
| Critical fasteners | Calibrate before the job, not after | Pre-job verification is cheap insurance |
Torque Wrench Storage Best Practices
Store every torque wrench at its lowest setting. Leaving a click-type wrench wound up at a high value keeps the spring under load and can cause it to drift over time.
A few habits protect accuracy:
- Back the setting down to the minimum after each use
- Keep the wrench in its case, away from moisture
- Avoid dropping it or using it as a breaker bar
For a wider routine, our guide to cleaning and maintaining power tools covers the storage habits that keep tools working longer.
Pick the Right Torque Wrench for Your Garage
The right wrench matches your work. A click-type wrench suits most home mechanics, beam wrenches never need setting, and electronic wrenches offer the tightest readouts.
Our torque wrench set gives you a practical starting point for garage and driveway jobs. For a broader look at outfitting your bench, see our picks for the best automotive tools for DIY car repairs.

Best for: home mechanics who want one reliable wrench for routine fastener work. Skip if: you need lab-grade traceability for critical assemblies.
Frequently Asked Questions
How often should a torque wrench be calibrated?
General practice is every 5,000 cycles or every 12 months, whichever comes first, though that is a guideline rather than a universal rule. A wrench used daily in a shop will need service sooner than one pulled out twice a year for lawn mower repairs. Add a calibration whenever the tool is dropped, overloaded, or stored with tension on the spring. Keeping a simple log of use and service dates makes the decision much easier.
Can you calibrate a torque wrench at home?
You can perform a torque wrench accuracy test at home using a known mass, a known lever length, and a vise, but that is a check, not a documented calibration. Teng Tools draws a clear line between a workshop check and a formal calibration record. A home test tells you whether the tool is close enough for weekend projects. It does not produce the traceable certificate a professional shop or safety-critical job requires.
What is the difference between calibrating and adjusting a torque wrench?
Adjustment changes the tool's setting so it clicks or reads at the correct value. Calibration is the broader process of measuring the wrench against a reference, documenting the results, and confirming it falls within tolerance. A wrench can be adjusted without ever being properly calibrated, which is why a certificate matters. Verification is the quick check in between: it confirms the tool still behaves as expected without altering anything.
How should you store a torque wrench to protect its accuracy?
Wind the setting back to its lowest value before putting the wrench away, and store it in its case in a dry spot. Leaving a click-type wrench set at 80 ft-lbs for months keeps the internal spring under load and can shift the reading. Avoid banging it around in a drawer with sockets. A dedicated case or a wall rack in your garage keeps the tool protected and easy to find.
Getting torque right comes down to treating calibration as a habit, not an afterthought. At Superior Tool Garage and Outdoors, we stock the garage tools and storage that help you work accurately and keep your bench organized. Our premium garage tools, heavy-duty storage solutions, and outdoor equipment are built to get the job done right. Get started with Superior Tool Garage and Outdoors and equip your garage for work you can trust.
