


Last Updated: October 29, 2026
Quick Summary
To install curtains on a backyard canopy, set the frame up fully at its final height, mark attachment points every 12 to 18 inches along the top rail, and mount tension rods, eye hooks, or a track. Thread or clip the panels on, leaving one side open for entry, and anchor the bottom hems against wind.
- Measure the opening first, then buy fabric at 1.5 to 2 times the width for fullness.
- Tension rods suit straight top rails, while wire or cable follows curved and angled frames.
- Space clips 10 to 12 inches apart on windy sides instead of 18 inches.
- Leave the hem 1 to 2 inches off the ground and overlap corner panels by 4 to 6 inches.
- Take panels down when the frame itself starts to move or a wind advisory is issued.
Table of Contents
- Tools, Hardware, and Curtains You Need Before You Start
- How to Measure Outdoor Curtains for Your Canopy
- Canopy Curtain Installation Hardware: What Works on Which Frame
- How to Hang Gazebo Curtains: Tension Rods, Cable, and Track Methods
- Step-by-Step: Installing Curtains on a Backyard Canopy Frame
- How to Secure Outdoor Curtains Against Wind
- Mistakes That Ruin Canopy Curtain Installs
- Pick Your Curtain Setup and Get It Hung This Weekend
- Frequently Asked Questions
Tools, Hardware, and Curtains You Need Before You Start
Installing curtains on a backyard canopy can turn a pop-up frame into a usable outdoor room.
Gather everything before you climb a ladder. A second trip to the garage mid-install is how panels end up on the grass.
- Curtain panels made for outdoor use, two per opening
- Measuring tape and a notepad
- Tension rods or a wire and cable kit with turnbuckles
If you want a frame that already accepts netting or curtain panels, our 10x15 FT Heavy Duty Pop Up Canopy with Mosquito Netting Walls includes four removable netting sidewalls.

How to Measure Outdoor Curtains for Your Canopy
Measure the opening first, then buy fabric. Guessing leads to panels that drag or leave a gap at the top. Pop-up canopies, permanent gazebos, and pergola-style frames each present a different measuring surface, so numbers do not transfer.
Measure by frame type
- Pop-up canopy with straight legs and a square top rail: measure leg-to-leg across the top rail, then from that rail to the ground. Measure to the outside face of each leg so the panel wraps the corner.
- Permanent gazebo with a curved or arched top: measure the straight span between corner posts at the height where the curtain will hang, not at the arch's widest point, then measure the drop to the ground. A measurement taken at the peak will leave the curtain too short.
- Angled or sloped frame: measure along the rail the curtain will follow, with the tape laid against the rail. A straight-line measurement overstates fabric and causes pooling.
Write each number down per side. Canopy frames are rarely perfectly square, so measure all sides you plan to cover, even if they look identical.
The measuring order that prevents rework
- Width: measure leg to leg across the opening at the height the curtain will hang.
- Height: measure from the top rail or hanging point to where the hem should end, usually 1 to 2 inches above the ground.
- Fullness: multiply width by 1.5 to 2. A 10-foot opening needs 15 to 20 feet of fabric. Go closer to 2x for lightweight fabric, 1.5x for heavy canvas.
- Hem and pocket allowance: add 4 to 6 inches to the height for a bottom hem and rod pocket or tab top, unless already sewn. Skipping this is why ready-made panels finish 3 inches off the ground.
- Clearance: leave 2 to 3 inches of slack at the bottom so the panel does not catch on wind gusts.
Avoid privacy gaps at corners and entries
A panel that measures exactly to the leg leaves a vertical slit of daylight at every corner. Overlap adjacent panels by 4 to 6 inches at each corner, or plan a return panel that wraps the corner leg.
For a 10x15 canopy, most people cover two or three sides and leave one open as the curtain opening for entry, which keeps airflow moving. If you cover three sides, measure the two short sides and one long side separately, frame tolerances and leg placement vary.
Once you have per-side numbers, add up total fabric width including fullness and corner overlaps before ordering. Buying panels one at a time usually ends with a dye-lot mismatch.
Canopy Curtain Installation Hardware: What Works on Which Frame
Frame type decides your hardware. A straight rail takes a tension rod. A curved or angled leg needs wire, cable, or a track.
Here is how the main methods line up:
| Frame Type | Best Hardware | Why It Fits |
|---|---|---|
| Straight top rail | Tension rod | Pushes into place with no drilling |
| Curved or angled frame | Wire or cable rope | Follows the bend without kinking |
| Flat underside with room | Curtain track | Smooth sliding, holds heavier panels |
| Open frame with exposed legs | Rod pockets, tabs, or straps | No extra hardware needed |
| Any frame, quick fix | Zip ties and clips | Fast, removable, cheap |
Before you buy, confirm your frame style.
Watch out: never drill into a canopy leg without checking that the wall is thick enough to hold a screw. A self-tapping screw into thin aluminum will pull out under wind load.
How to Hang Gazebo Curtains: Tension Rods, Cable, and Track Methods
Three methods cover almost every canopy. Pick the one that matches your frame and how often you plan to open and close the panels.
Tension Rods for Straight Openings
Tension rods are the fastest option for a straight top rail. Measure the gap between the legs, buy a rod 2 to 4 inches longer, and twist it to extend until it presses firmly against both legs.
Spring tension holds the rod in place; add a small screw or clamp at each end if it creeps. This suits lightweight panels and frames you set up and take down each season.
Wire or Cable Rope for Curved and Angled Frames
A wire or cable rope follows curves a rigid rod cannot. Thread it through eye hooks or around the legs, then tighten with a turnbuckle at one end.
10x15 FT Heavy Duty Pop Up Canopy with Mosquito Netting Walls →
Hang the panel with S-hooks or curtain rings. Keep the cable tight enough not to sag but not so tight it bows the frame.
Rod Pockets, Tabs, and Straps on the Curtain Panel
Some panels come ready to hang with a rod pocket sewn along the top. Slide the rod or cable through the pocket and you are done. Tabs and straps work the same way but let you space the panel evenly along the frame.
If your panels have no pocket, sew one or add grommets every 12 to 18 inches, spaced evenly so the fabric hangs straight.
Step-by-Step: Installing Curtains on a Backyard Canopy Frame
Set up the canopy first, fully opened and at its final height. Hanging curtains on a half-raised frame means redoing the work.
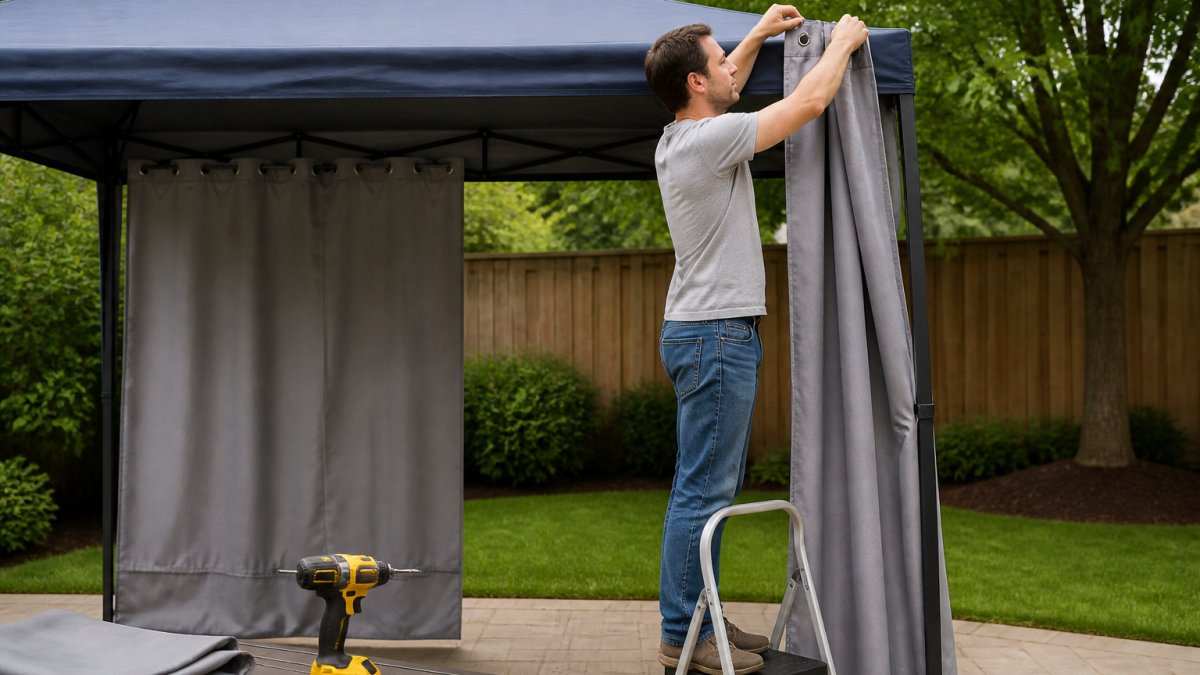
- Assemble the canopy and lock every leg at the same height using the thumb latch so the frame sits level.
- Mark attachment points with a pencil, spacing them every 12 to 18 inches along the top rail.
- Install the hardware, tension rods, eye hooks, or a track, at each mark.
- Thread the first panel through the rod pocket or clip it to the rings, starting at one corner and working across.
- Check the hem height and adjust clips or straps until the bottom sits 1 to 2 inches off the ground.
- Repeat on the remaining sides, leaving one open for entry.
- Test the slide by opening and closing each panel to confirm nothing binds.
Tie back each panel with a strap when not in use. This keeps the fabric from flapping and extends its life.
How to Secure Outdoor Curtains Against Wind
Wind is the number one reason canopy curtains fail. Pair your wind protection with weather resistant outdoor furniture sets for the whole canopy area. A loose panel acts like a sail and can bend a leg or tear a grommet. On a lightweight pop-up frame the risk is higher than on a permanent gazebo, because the frame has less mass and its anchors are usually stakes or weights rather than footings.
Understand what wind actually does to a canopy curtain
A hanging panel catches wind across its full surface, and that force transfers to the top-rail attachment points and the canopy's leg anchors. A panel clipped only at the top loads the rail and clips entirely; anchoring the bottom splits the load, which is why bottom anchoring matters more than adding top clips.
The frame usually fails before the fabric does. Thin aluminum or steel pop-up legs bend where the top rail meets the leg, especially when one side is curtained and the opposite side is open to crosswind.
Safe attachment points on a canopy frame
- Clip to the top rail, not the leg joint. The rail is usually the stiffest part of a pop-up frame. The sliding leg joint and the thumb latch are the weakest points and should not carry hanging load.
- Spread the load. Space clips 10 to 12 inches apart on windy sides rather than 18 inches. More attachment points mean less fabric between them to billow.
- Use clips with a wide jaw or a strap loop rather than a narrow hook that concentrates force on one thread of the fabric.
Wind tactics that work on a canopy
- Anchor the bottom. Clip weights, sandbags, or tie-downs to the lower hem. This is the single most effective step because it stops the panel from billowing inward.
- Add tie-backs. Wrap a strap around each panel and the leg when the canopy is open. Tie-backs also keep panels from whipping against the frame.
- Use bungee straps between grommets and the frame for a little give.
When to tie back, and when to take panels down
Tie panels back when wind is steady but below the point where the frame rocks. Take panels down when the frame itself starts to move, when gusts would flatten a patio umbrella, or when a wind advisory is issued.
A practical rule: if you would not leave the bare canopy up in the wind, do not leave the curtains on it either. Fabric adds surface area the frame was never rated to carry.
Mistakes That Ruin Canopy Curtain Installs
- Buying indoor fabric. Cotton and lightweight polyester rot, fade, and shrink outdoors. Choose outdoor fabric rated for sun and rain.
- Skipping the fullness math. Flat panels look cheap and leave gaps. Always buy 1.5 to 2 times the opening width.
- Hanging before leveling. An unlevel frame makes every panel hang crooked.
Fix these before you start and the install goes smoothly the first time.
Pick Your Curtain Setup and Get It Hung This Weekend
The right setup comes down to three choices: frame type, hardware, and how much wind your yard gets. Match all three and the panels will hang straight and stay put.
Superior Tool Garage and Outdoors offers premium garage tools and outdoor equipment, including heavy-duty storage solutions and canopies.
Get started with Superior Tool Garage and Outdoors and turn your canopy into a shaded, private retreat you will actually use. Finish the space with outdoor furniture to complete the backyard setup.
Frequently Asked Questions
How do you attach curtains to a backyard canopy without drilling?
Clamp-on rod holders, ball bungees, and zip ties all attach to canopy legs and frame bars without a single hole. For straight openings, a tension rod wedged between two legs holds firm with no hardware at all. On curved or angled frames, run wire or cable rope through eye hooks that clamp onto the frame. Drilling is only needed when you want a permanent rod on a wooden or metal structure, and it is never required on a pop-up canopy frame.
How do you keep outdoor curtains from blowing in the wind?
Weigh the bottom hem down first. Sew small pockets for sandbags or use weighted curtain weights, then tie each panel to the canopy legs with straps or ties at the bottom. Leave the panels slightly loose so gusts pass through instead of yanking the frame. In sustained high wind or storms, take the curtains down entirely. A 10x15 canopy with netting sidewalls, like the heavy duty pop up canopy at Superior Tool Garage and Outdoors ($294.99), includes four removable netting sidewalls.
How do you measure curtains for a gazebo or canopy?
Measure the opening width between the two attachment points, then measure from the rod or wire height down to where you want the hem to stop, usually 1 to 2 inches above the ground. Add 4 to 6 inches of width per panel for gathering and overlap. Measure each side separately because canopy frames are rarely perfectly square. Write the numbers down before you shop so you buy panels that actually fit.
Should outdoor canopy curtains be removed in bad weather?
Yes. Take panels down before storms, high wind warnings, or winter storage. Wind load on fabric acts like a sail and can bend canopy legs or tear rod pockets. Most canopy curtains dry fast and fold small, so removal takes minutes. Check the fabric is fully dry before storing to prevent mildew, and inspect hooks, clips, and straps each season for wear before you hang them again.
