


Table of Contents
- What You'll Need: Tools and Materials for Garage Flooring Installation
- Preparing Your Concrete Subfloor for Rubber Flooring
- Rubber Garage Floor Tiles vs. Rolls: Which Installation Method Fits Your Space
- How to Install Rubber Garage Flooring: Step-by-Step Process
- Common Mistakes to Avoid During Installation
- Maintenance, Repairs, and Eco-Friendly Disposal
- Frequently Asked Questions
Last Updated: September 27, 2026
What You'll Need: Tools and Materials for Garage Flooring Installation
Gather all tools and materials before starting to prevent delays.
Essential tools:
- Utility knife with sharp blades
- Straight edge or long ruler
- Tape measure
- Trowel (notched if using adhesive)
- Seam roller or hand roller
- Degreaser and cleaning supplies
- Moisture meter for testing subfloor
- Knee pads for comfort
Materials you'll need:
- Rubber flooring (tiles or rolls)
- Seam tape (if required for your product)
- Adhesive (solvent-based or water-based, depending on your flooring type)
- Vapor barrier or moisture barrier
- Threshold trim for doorways
- Leveling compound (if subfloor is uneven)
Check your product's installation guide before purchasing, some use interlocking systems with no adhesive, while others require double-sided tape or solvent-based adhesive.
Preparing Your Concrete Subfloor for Rubber Flooring
A poorly prepared concrete slab causes rubber flooring to fail, buckle, or separate within months.
Clean the concrete thoroughly with degreaser to remove oil, dirt, and residue. Sweep and vacuum, debris creates gaps between flooring and slab.
Inspect for cracks. Fill larger cracks with leveling compound or concrete filler before installing flooring.
Use a straight edge to check for high spots and low areas. If significant dips or peaks exist, use self-leveling compound to create a smooth, flat surface.
Allow leveling compound to cure completely (typically 24-48 hours) per manufacturer instructions.
Moisture Testing and Vapor Barriers
Trapped moisture causes adhesive failure, mold growth, and buckling. Test your concrete before installation.
Use a moisture meter on several spots across the floor. If readings exceed the manufacturer's recommended level, install a vapor barrier.
A vapor barrier prevents ground moisture from wicking up through the slab. Use a polyethylene sheet or moisture barrier product designed for garage floors.
Rubber Garage Floor Tiles vs. Rolls: Which Installation Method Fits Your Space
Rubber flooring comes in two main forms: interlocking tiles and rolls. Each has different installation requirements and benefits.
Rubber tiles are individual squares (usually 12x12 or 18x18 inches) that interlock without adhesive, making them the easiest DIY option. You can replace individual damaged tiles, making them ideal for smaller garages.
Tiles have more visible seams than rolls, though some prefer this trade-off for easier installation.
Rubber rolls come in large sheets (typically 4-8 feet wide) and create a seamless appearance. However, they require more precision during installation and are harder to repair if damaged.
Rolls require adhesive and careful seam management, demanding more skill. Tiles are the safer choice for less experienced installers.
For small garages under 200 square feet, tiles are usually better. For larger spaces, rolls offer efficiency. Consider your skill level and comfort with adhesives.
How to Install Rubber Garage Flooring: Step-by-Step Process
The actual installation follows a logical sequence. Rushing through any step creates problems later.
Step 1: Plan Your Layout and Measure
Measure your garage floor dimensions and calculate total square footage.
Plan your layout before cutting. For tiles, decide where the pattern starts. For rolls, position seams to minimize waste and visibility.
Mark reference lines with chalk to keep your installation straight and prevent fitting problems at edges.
Position seams away from high-traffic areas, as they wear faster in walkways.
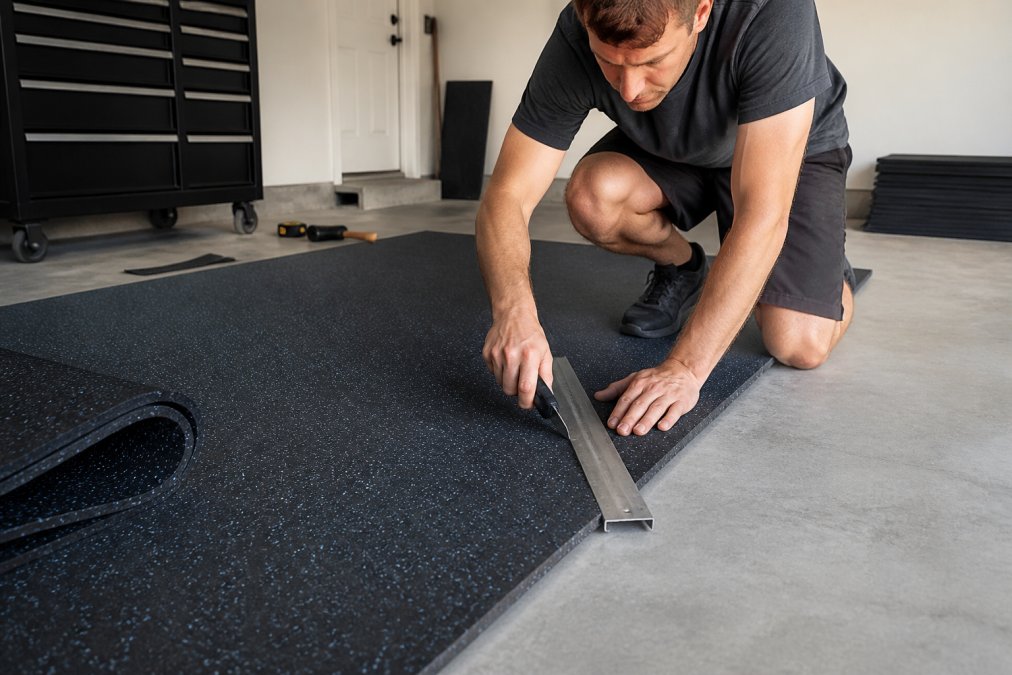
Step 2: Cut and Trim to Fit
Measure twice, cut once, mistakes are expensive.
Use a utility knife with a sharp blade (replace frequently) and a straight edge to ensure clean cuts.
For tiles, score and snap.
Step 3: Apply Adhesive or Use Interlocking System
Interlocking tiles need no adhesive, simply snap them together. This is why many DIYers prefer tiles.
Step 4: Manage Seams and Allow Curing Time
Poorly managed seams separate, collect dirt, and look unprofessional.
For rolled flooring, apply seam tape along joints to hold seams together and prevent separation.
Common Mistakes to Avoid During Installation
Most installation failures come from skipping or rushing critical steps.
| Mistake | Impact | Prevention |
|---|---|---|
| Skipping moisture test | Adhesive failure, mold | Test concrete, install vapor barrier |
| Poor subfloor prep | Bumps, uneven wear | Clean, fill cracks, level surface |
| Wrong adhesive | Separation, failure | Use manufacturer-recommended product |
| Rushing cure time | Shifting, gaps | Wait full curing time |
| No expansion gaps | Buckling, damage | Leave 1/4-inch gap at walls |
| Poor seam work | Visible gaps, wear | Use tape and sealer properly |
Maintenance, Repairs, and Eco-Friendly Disposal
Regular maintenance and knowing how to repair damage extends floor life and prevents costly replacement.
Regular cleaning and care:
Repairing damaged rubber tiles:
-
Remove the damaged tile: Interlocking tiles snap together at the edges. Pry up one corner of the damaged tile using a flat pry bar or screwdriver. Work your way around the tile, lifting gently until it releases from its neighbors. If the tile was adhered (some systems use light adhesive), you may need to cut it into smaller pieces and pry them out individually.
-
Clean the subfloor: Once the tile is removed, inspect the concrete underneath. If adhesive residue remains, scrape it off with a putty knife. Wipe the area clean with a damp cloth and allow it to dry completely.
-
Install the replacement tile: Snap the new tile into place, aligning it with the surrounding tiles. Apply pressure to ensure the interlocking edges are fully seated. No adhesive is needed for most interlocking systems; the mechanical lock holds the tile in place.
Repairing damaged rubber rolls:
For small cuts or punctures (under 2 inches):
- Clean the damaged area and surrounding rubber with a damp cloth. Allow to dry.
- Use a rubber patch kit. These kits include adhesive and a rubber patch material.
- Apply the adhesive to the patch and press it firmly over the damage, smoothing out air bubbles.
- Allow the adhesive to cure per the kit instructions (typically 24 hours) before foot traffic.
For larger damage (2-12 inches) or section replacement:
- Mark the damaged area with chalk, outlining a rectangular section that extends at least 6 inches beyond the damage in all directions.
- Using a utility knife and straight edge, cut through the rubber flooring along your marked lines. Cut only the rubber, not the concrete.
- Carefully peel back the cut section. If it's adhered, use a pry bar and heat gun (set to low) to soften the adhesive and lift the rubber away.
- Scrape off old adhesive from the concrete using a putty knife. Clean the area thoroughly and allow it to dry.
- Measure the removed section and cut a replacement piece from matching rubber flooring material. (This is why keeping a spare tile or small roll is wise.)
- Apply fresh adhesive to the concrete using a notched trowel, following the original product's specifications.
- Press the new piece firmly into place, working from the center outward to eliminate air bubbles.
- If the repair is at a seam, apply seam tape and sealer along the edges to match the original installation.
- Allow adhesive to cure fully (24-48 hours) before using the garage.
Preventing damage:
Eco-friendly disposal of old flooring:
Recycling options:
- Local recycling centers: Many accept rubber flooring. Call ahead to confirm. Some charge a small fee ($0.10-$0.25 per pound) for disposal; others accept it free.
- Rubber recycling specialists: Search for "rubber recycling near me" to find facilities that process rubber into new products. Recycled rubber is used for playground surfaces, athletic tracks, mulch, and asphalt additives.
- Donation: If your flooring is still in good condition but you're upgrading, contact gyms, CrossFit boxes, or community centers. Many accept donated rubber flooring for their facilities.
- Manufacturer take-back programs: Some flooring manufacturers operate take-back programs. Contact the original manufacturer to ask if they accept old flooring for recycling.
Frequently Asked Questions
Can you put rubber flooring directly on concrete?
Yes, rubber flooring can be installed directly on concrete, but only after proper preparation. The concrete must be clean, dry, and level. Moisture testing is critical, concrete should have a moisture vapor emission rate below 3 lbs per 1,000 sq ft per 24 hours. If moisture levels are higher, install a vapor barrier first. Any cracks or uneven areas should be filled with leveling compound to prevent flooring from shifting or developing gaps over time.
What tools are needed for garage flooring installation?
Essential tools needed for garage flooring installation include a utility knife for cutting, a straight edge for guiding cuts, a trowel for applying adhesive, a roller or tamper for pressing flooring down, a measuring tape, and a level to check for uneven spots. If using interlocking tiles, you may not need adhesive tools. A degreaser and mop help clean the concrete before installation. For seam work, seam tape and a heat gun (for some products) may be necessary. Protective gear like gloves and safety glasses is also recommended.
Should I use adhesive or interlocking tiles for my garage?
The choice between adhesive and interlocking systems depends on your space and future needs. Adhesive installation (solvent-based or water-based) creates a permanent, seamless surface ideal for high-traffic garages and provides better durability. Interlocking tiles offer flexibility, they're easier to remove or replace individual sections and require no curing time. For heavy vehicle traffic or long-term installations, adhesive is more durable. For temporary setups or if you want to rearrange later, interlocking tiles work better. Adhesive systems typically offer better slip resistance and impact resistance.
How long does rubber garage flooring take to cure after installation?
Curing time depends on the adhesive type. Water-based adhesives typically cure in 24 hours, while solvent-based adhesives may take 48-72 hours. During curing, avoid heavy foot traffic and vehicle weight on the flooring. Temperature and humidity affect curing speed, cooler, more humid conditions slow the process. Check your adhesive manufacturer's instructions for exact times. Proper curing is essential for achieving full durability and preventing seam buckling or movement.
Installing rubber garage flooring transforms your workspace into a durable, professional environment. The process requires careful preparation and attention to detail, but the results are worth the effort. Superior Tool Garage and Outdoors provides the premium tools and materials you need to complete this project successfully. Our heavy-duty equipment ensures your installation meets professional standards. Get started with the right tools and create a garage floor that lasts for years.