


Table of Contents
- Why Garage Floor Coating Fails: The Main Culprits
- How to Prepare Concrete for Epoxy Coating
- Moisture Testing for Garage Floors
- Incorrect Resin and Hardener Mixing
- Environmental Conditions During Application
- Epoxy vs Polyaspartic Durability
- Fixing a Failed Garage Floor Coating
- Conclusion
- Frequently Asked Questions
Last Updated: September 24, 2026
Why Garage Floor Coating Fails: The Main Culprits
Garage floor coating fails due to predictable, preventable causes: poor surface preparation, moisture, incorrect mixing, or environmental mistakes during application. Understanding these failure points lets you avoid them.
How to Prepare Concrete for Epoxy Coating
Surface preparation is where most garage floor coating fails. Dust, dirt, oil, and old sealers prevent epoxy from bonding to concrete.
Mechanical grinding is the gold standard. A concrete grinder removes the top layer, opens pores, and raises the surface profile, the microscopic peaks and valleys that anchor epoxy.
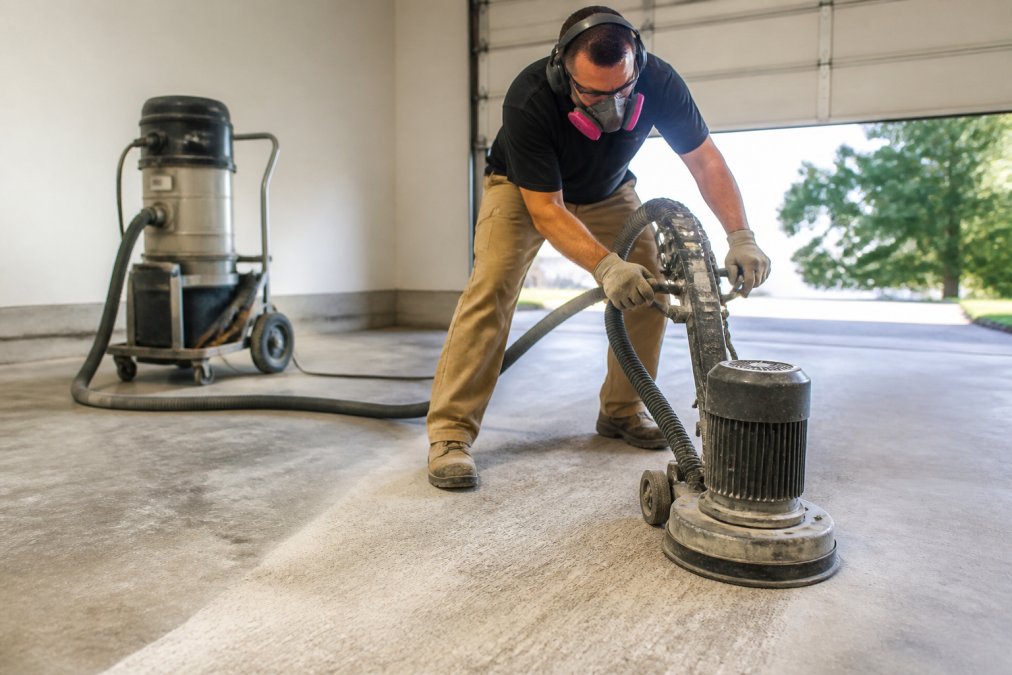
Acid etching is an alternative for smaller projects but is less effective than grinding at raising surface profile.
After grinding or etching, vacuum thoroughly and wipe with a damp cloth. Let it dry completely before testing for moisture.
Moisture Testing for Garage Floors
Moisture causes roughly 60-70% of epoxy coating failures in residential garages. Concrete holds water that will destroy your coating if not tested and managed.
Understanding Moisture Vapor Transmission
Moisture vapor transmission (MVT) is water vapor moving upward through concrete. Even if concrete feels dry, vapor constantly moves because concrete is hygroscopic, it absorbs and releases moisture based on humidity and temperature.
Epoxy is moisture-sensitive. Water vapor interferes with the resin-hardener reaction, trapping moisture under the coating and creating pressure that causes blistering, delamination, or peeling within days or weeks.
Testing for Moisture: Calcium Chloride and Relative Humidity Methods
You must test for moisture before applying any coating. There are two standard methods:
Calcium chloride (CaCl₂) testing measures moisture vapor through concrete. A test kit placed under a dome for 24 hours absorbs moisture; you weigh it before and after to calculate MVER (pounds per 1,000 sq ft per 24 hours). Most epoxy requires MVER below 3-5 lbs/1,000 sq ft/24 hrs. Testing costs $15-40 but takes 24 hours and only measures surface moisture.
Relative humidity (RH) testing measures humidity inside concrete pores via a probe inserted into a drilled hole (24-72 hours equilibration). Most epoxy requires RH below 75-80%. RH testing costs $300-1,000+ and takes longer but is more reliable for deep moisture.
For DIY projects, start with a calcium chloride test. Below 3 lbs/1,000 sq ft/24 hrs: apply standard epoxy. Between 3-5 lbs: use a moisture-blocking primer. Above 5 lbs: use a moisture barrier or wait for drier conditions. If borderline, invest in RH testing.
Moisture Barriers and Primers
If your moisture test shows elevated levels, you need a moisture barrier, a primer or sealer that blocks vapor transmission and allows epoxy to cure properly.
Moisture-blocking primers are epoxy or polyurethane products that seal concrete and prevent vapor transmission. Applied before topcoat epoxy, they allow application when moisture is moderately elevated (up to 5-7 lbs/1,000 sq ft/24 hrs). Cost: $30-60 per gallon; coverage: 300-400 sq ft per gallon.
Moisture-mitigating epoxies cure in moderate moisture but cost more ($40-80 per gallon vs. $25-50 for standard epoxy).
If moisture is very high (above 8 lbs/1,000 sq ft/24 hrs), address the source: poor drainage, leaking sump pump, or high water table. You may need a vapor barrier or commercial-grade mitigation system.
Humidity and Temperature During Application
Even if concrete moisture is controlled, air humidity and temperature during application matter greatly.
Relative humidity should be 40-85% during application. Above 85%, condensation prevents curing; below 40%, epoxy cures too fast, trapping bubbles. Dew point is critical, concrete temperature must be at least 5°F above dew point. Use a digital humidity/temperature meter ($20-50).
Temperature should be stable, typically 60-75°F during application and curing.
Concrete Age and Moisture
New concrete (less than 28 days old) is actively curing and releasing moisture. Wait at least 28 days before testing; ideally 60-90 days before coating. Mature concrete (1-5 years old) has stabilized; moisture is usually manageable with a primer. Old concrete (10+ years) is dry unless there's water intrusion.
Seasonal Moisture Variations
Moisture levels vary by season. Late summer and fall are drier and ideal for coating. If applying in spring or early summer, test for moisture and use a moisture-blocking primer.
Summary: The Moisture Testing Checklist
- Test for moisture using a calcium chloride test or RH probe before coating.
- Know your threshold. Standard epoxy requires MVER below 3-5 lbs/1,000 sq ft/24 hrs or RH below 75-80%.
- Use a moisture barrier if moisture is elevated.
- Check humidity and dew point before application (40-85% humidity; concrete 5°F above dew point).
- Wait for new concrete to cure at least 28 days (ideally 60-90 days).
- Retest if conditions change. Retest in late summer if spring testing showed high moisture.
Moisture testing costs $15-50 and prevents a $2,000-5,000 failure.
Incorrect Resin and Hardener Mixing
The resin-to-hardener ratio must be exact. Measure by volume or weight, never by eye. Stir slowly for 3-5 minutes, scraping sides and bottom. Air bubbles create voids. Aim for 60-75°F during application and curing.
Environmental Conditions During Application
Apply epoxy only when conditions are right: 40-85% humidity, 60-85°F, and stable temperature. Avoid early morning, late evening, and direct sunlight. Ventilate well to release VOCs and help moisture evaporate.
Epoxy vs Polyaspartic Durability
Epoxy and polyaspartic are both popular for garage floors but behave differently.
Fixing a Failed Garage Floor Coating
If your coating is already failing, remediation depends on the failure type, concrete age, and what's underneath the failed coating. A reactive fix without diagnosis will likely fail again.
Identifying the Failure Type
Peeling or delamination (coating lifts in sheets) signals poor adhesion from inadequate surface preparation, moisture, or a chemical barrier between concrete and coating. Blistering or bubbling (dome-shaped pockets) indicates moisture vapor transmission, water vapor trapped under epoxy during curing. Cracking or crazing (fine spider-web cracks) suggests concrete movement, incorrect resin-to-hardener ratio, or coating applied over concrete too young to be stable. Soft or tacky spots point to incomplete curing from incorrect mixing, cold temperatures, or high humidity.
Removal Methods: Grinding vs. Chemical Stripping
Mechanical grinding removes failed coating and top concrete in one pass, eliminating residual coating and preparing the substrate. Downside: significant dust. Chemical stripping dissolves epoxy without removing concrete, generates less dust, but is slower and requires additional prep. For most floors, grinding is faster and more thorough.
Concrete Slab Age and Coating Failure
New concrete (less than 28 days old) is still curing and releasing moisture. Applying epoxy to concrete younger than 28 days is a common failure cause. When you repair, wait until concrete has fully cured (28 days minimum from pour date). Test moisture levels before reapplying. New concrete may have a curing compound on the surface that must be removed before coating. Grinding removes it; chemical stripping may not.
Chemical Compatibility: The Hidden Failure Cause
One of the most overlooked reasons for coating failure is applying new epoxy over an unknown sealer, curing compound, or old coating. These chemical barriers prevent new epoxy from bonding to concrete.
Step-by-Step Remediation Process
- Identify the failure type using the visual guide above.
- Determine the removal method. For most failures, grind the entire floor back to bare concrete. For small areas, use chemical stripping followed by light grinding.
- Remove all failed coating and contaminants. Grind until you reach solid concrete with no residual coating, sealer, or curing compound. Vacuum thoroughly.
- Test for moisture. Use a calcium chloride test or relative humidity meter. If moisture is elevated, use a moisture-blocking primer.
- Inspect the concrete. Look for cracks, spalling, or damage. Repair significant cracks with concrete filler before recoating.
- Clean the surface. Wipe with a damp cloth and allow to dry completely (at least 24 hours after grinding).
- Apply primer. Use a moisture-blocking primer if moisture testing showed elevated levels.
- Apply topcoat. Follow manufacturer's instructions exactly: correct resin-to-hardener ratio, proper mixing time, and application within recommended temperature and humidity range.
- Control the environment. Keep garage temperature between 60-75°F and humidity below 85% during application and curing. Maintain ventilation.
- Wait for full cure. Don't put weight on the floor until the manufacturer's full cure time has passed (typically 7 days for epoxy, 24 hours for polyaspartic).
If the original failure was due to concrete age, moisture, or a chemical barrier, address that root cause during remediation. Otherwise, the new coating will fail the same way.
When to Upgrade to Professional-Grade Systems
DIY epoxy kits have limitations. They often include lower-quality resins, minimal primers, and vague instructions. If your floor has already failed once, upgrading to a professional-grade epoxy system can improve durability.
Conclusion
Garage floor coating fails because of poor preparation, moisture, mixing errors, or bad timing. Each failure is preventable if you follow the right steps.
Frequently Asked Questions
What causes garage floor coating to fail?
Garage floor coating fails for several reasons: improper surface preparation, moisture vapor transmission through the concrete, contaminated surfaces, incorrect resin-to-hardener ratios, and poor environmental conditions during application. Hot-tire pickup, where vehicle tires stick to the coating, also indicates failure. The most common cause is skipping proper surface preparation or ignoring moisture levels before application. Addressing these factors during installation prevents most failures.
How do you test for moisture before applying epoxy?
Use a calcium chloride test or in-situ relative humidity (RH) meter to measure moisture vapor transmission. The calcium chloride test involves placing a dome on the concrete surface for 24 hours to measure moisture vapor emission rate (MVER). Most epoxy systems require MVER readings below 3 pounds per 1,000 square feet per 24 hours. If moisture levels exceed this threshold, install a moisture barrier or allow the concrete to cure longer. Testing before application is essential to avoid delamination and blistering.
Is epoxy or polyaspartic better for durability?
Polyaspartic coatings generally offer faster curing than epoxy. Polyaspartic systems cure in hours rather than days. However, epoxy offers excellent bond strength and chemical resistance at a lower cost. Epoxy remains effective when properly applied in controlled conditions.
Can you apply epoxy over a damp concrete floor?
No. Applying epoxy over damp concrete causes poor adhesion, blistering, and peeling. Water prevents the resin from bonding properly to the substrate, resulting in early failure. Always test moisture levels before application and ensure the concrete surface is completely dry. If moisture vapor transmission is high, use a moisture-blocking primer or allow additional curing time. Skipping this step is one of the most common reasons for coating failure in DIY projects.
The difference between a coating that lasts and one that fails comes down to preparation, moisture control, and timing. Most homeowners skip one of these steps and pay the price. By understanding why garage floor coating fails, you can avoid the mistakes and build a floor finish that stands up to traffic, spills, and time.